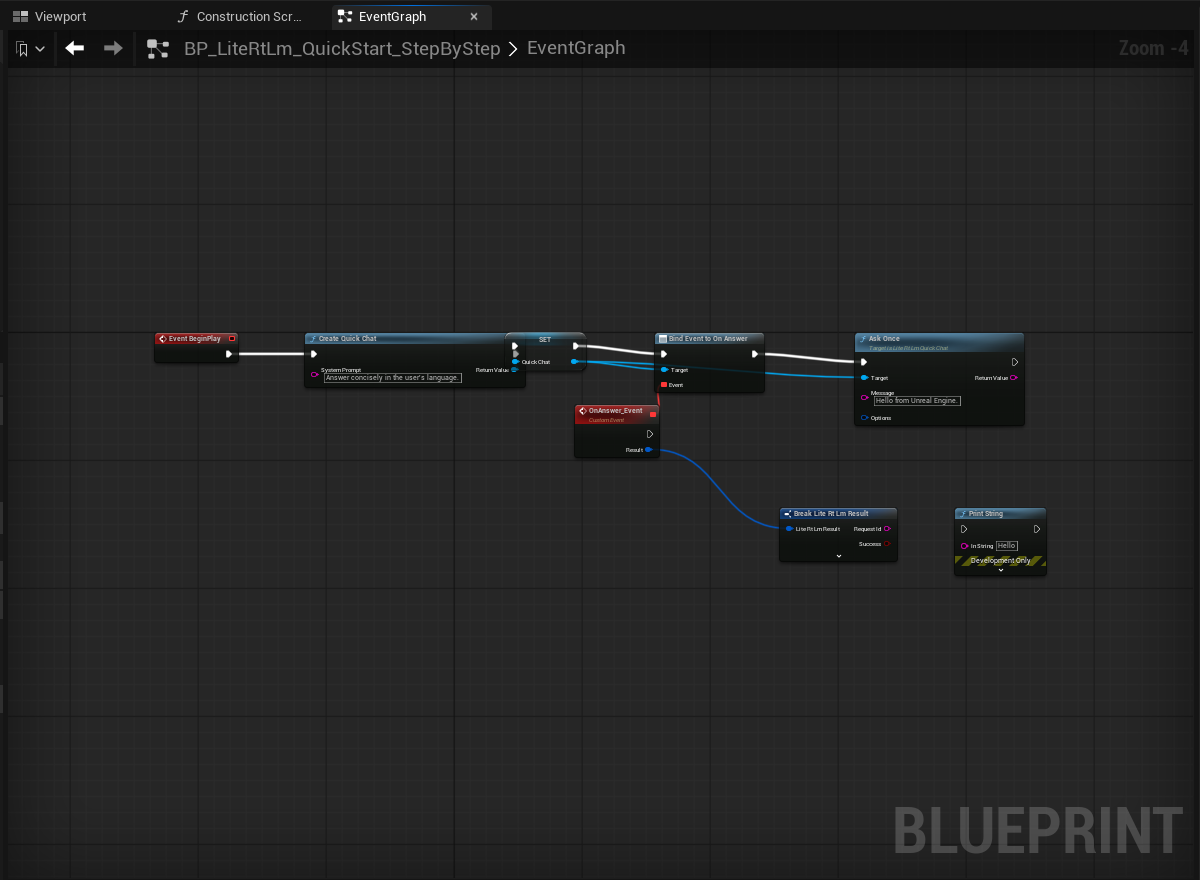
Blueprint · 38 atomic frames · 40 real English UE5 screenshots

One visible change, one screenshot

This page has one job: take you from an empty Actor Blueprint to a real local AI answer. Each card performs one visible action. Continue only after your editor matches the picture.

This is a linear tutorial. Do not jump to the finished graph and copy it. Complete each frame in order. For node, system, C++, MCP, or packaging reference, use the separate Documentation Index.
The Demo and plugin are decoupled. The Demo repository no longer contains plugin source or a plugin submodule. Install LiteRT-LM separately first. The canonical documentation entry is winyunq.github.io/LiteRT-LM-Unreal.

Preparation

0. Make the plugin and model available

0A

Open Edit → Plugins, search for LiteRT, and enable LiteRT-LM.
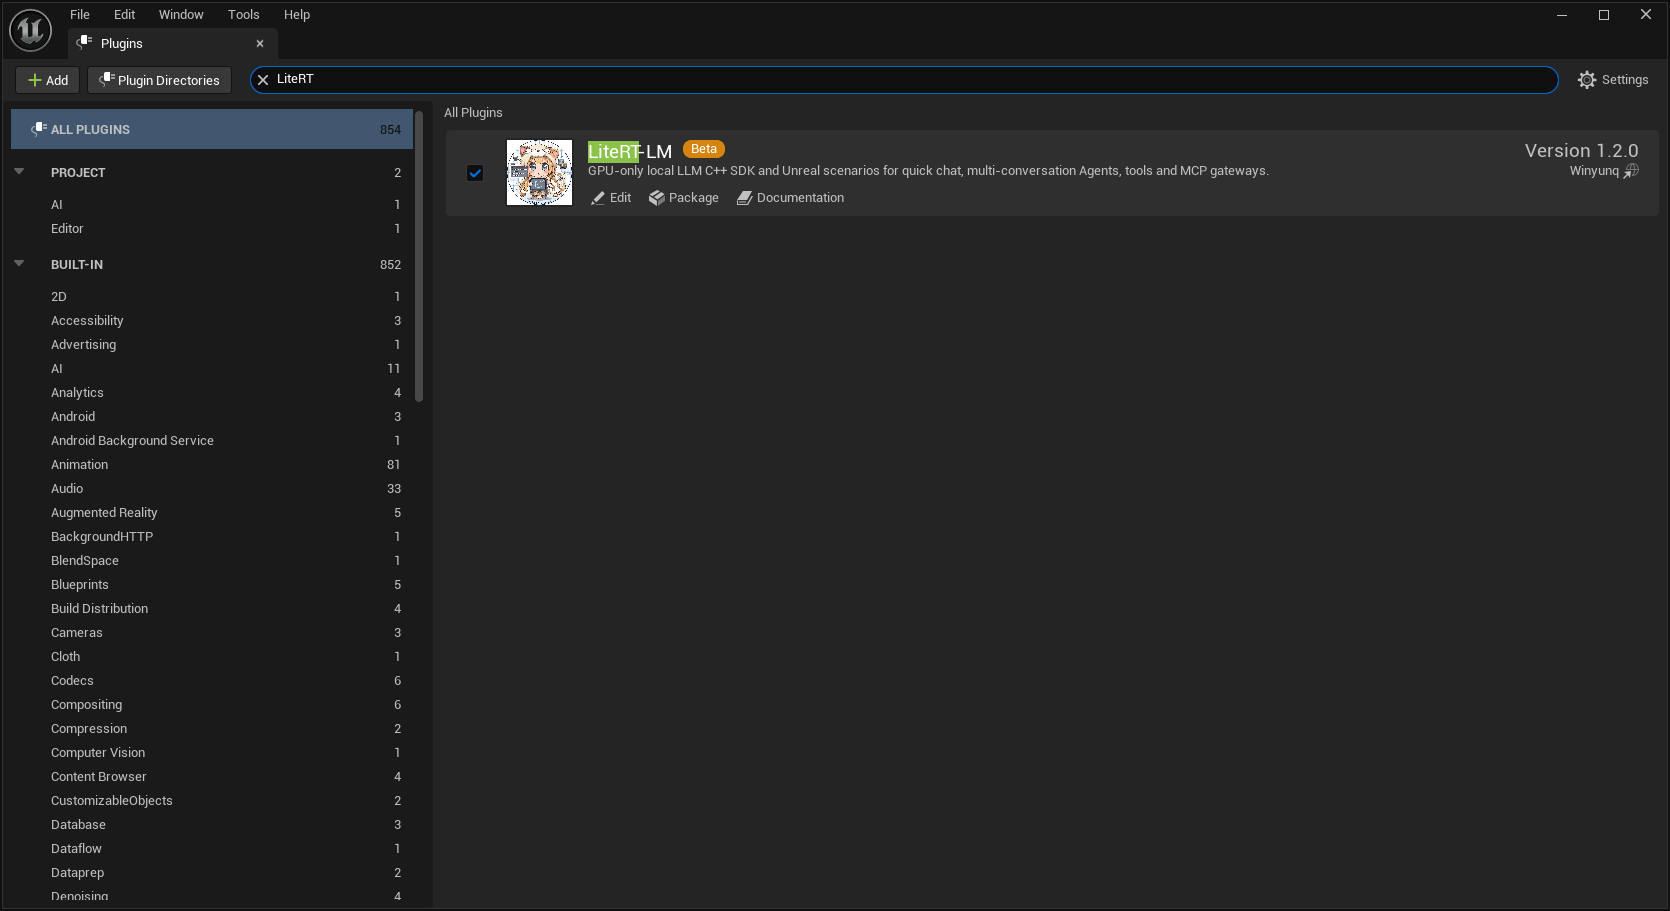
LiteRT-LM enabled in the English UE5 Plugins window
If Unreal asks for a restart, restart before continuing.
0B

Set Model Path in Project Settings, relative to Content.
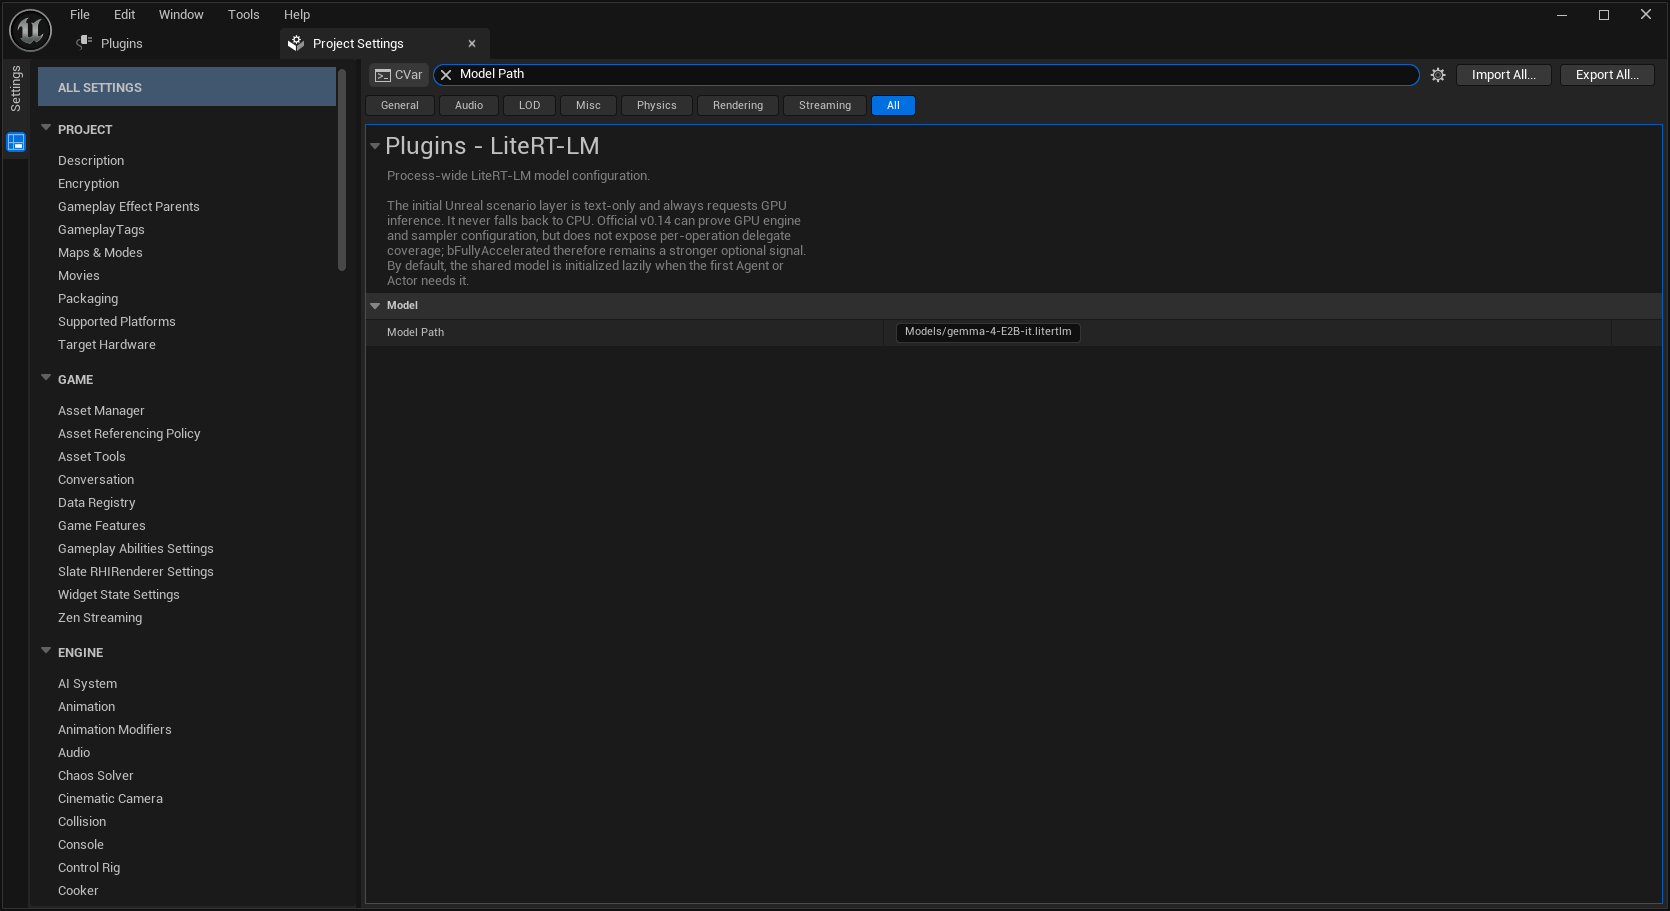
LiteRT-LM Model Path in English UE5 Project Settings
The example is Models/gemma-4-E2B-it.litertlm. Your filename may differ, but the file must exist.

Actor

1. Create a persistent Actor Blueprint

01

Open the Content Drawer and enter the folder for the tutorial asset.
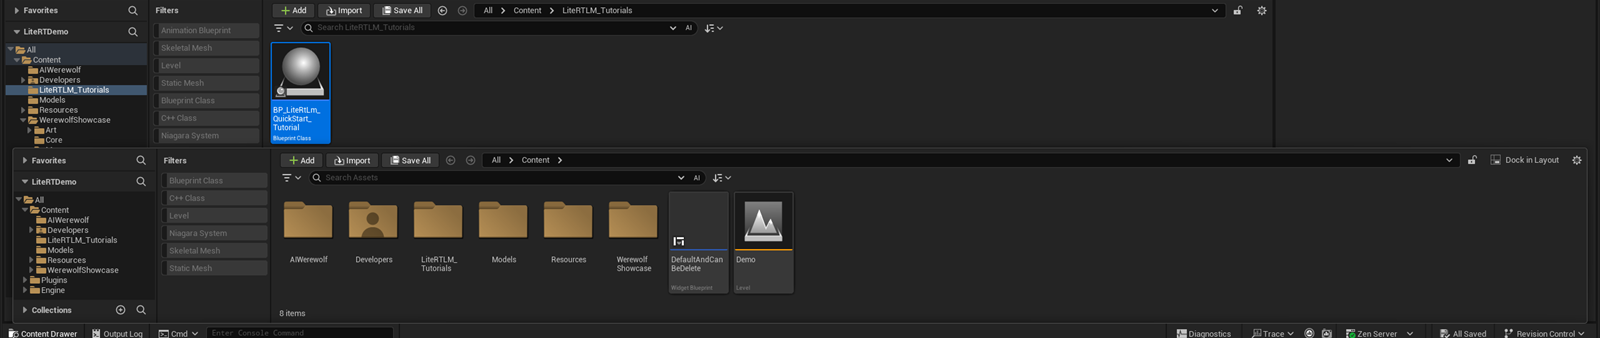
UE5 Content Drawer open on a content folder
This guide uses /Content/LiteRTLM_Tutorials. You may use your own folder.
02

Click Add, then choose Blueprint Class.
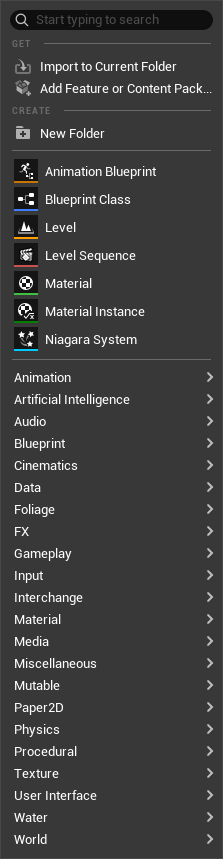
Add menu in the Content Browser
Choose only Blueprint Class for this step.
03

Select Actor in the Pick Parent Class window.
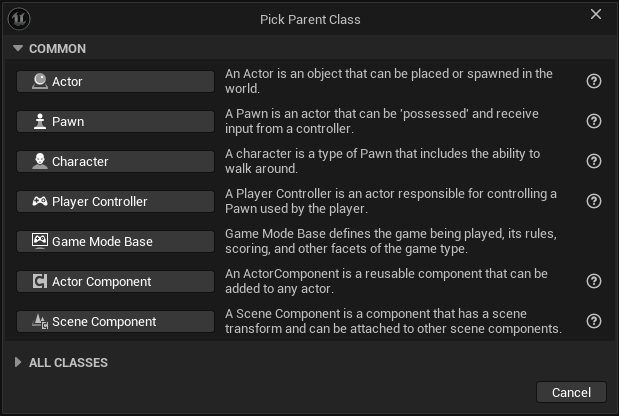
Actor selected in the Pick Parent Class window
Use a regular Actor, not Pawn, Character, or Widget.
04

Name the new Blueprint BP_LiteRtLm_QuickStart_StepByStep.
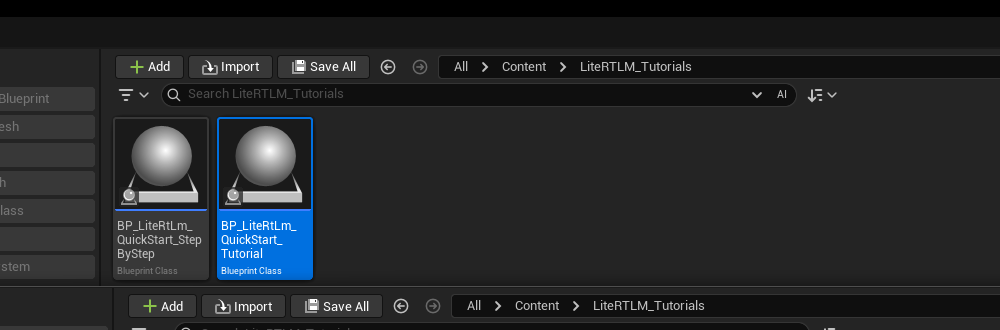
The named tutorial Actor Blueprint in the Content Browser
The Blueprint must retain a Quick Chat reference, so do not substitute a Level Blueprint.
05

Double-click the new asset to open the Blueprint Editor.
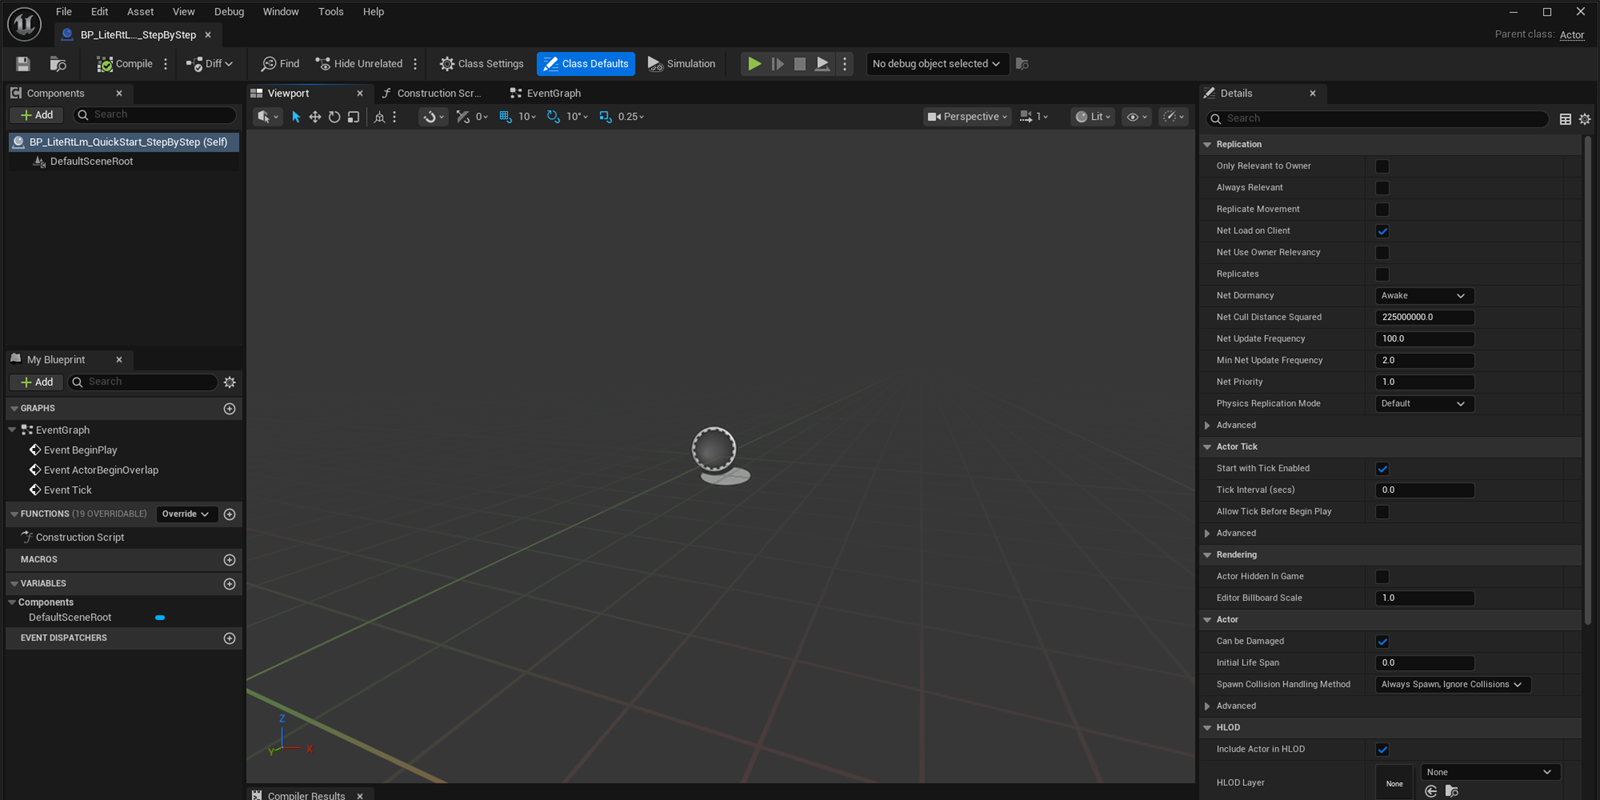
The new Actor Blueprint open in the Blueprint Editor
Confirm that the top-right corner says Parent class: Actor.

Variable

2. Create the QuickChat object reference one change at a time

06

In My Blueprint, click Add and then Variable.
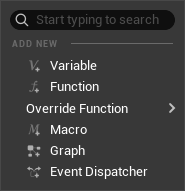
Variable selected from the My Blueprint Add menu
This adds one member variable.
07

When NewVar appears, leave its type unchanged for the moment.
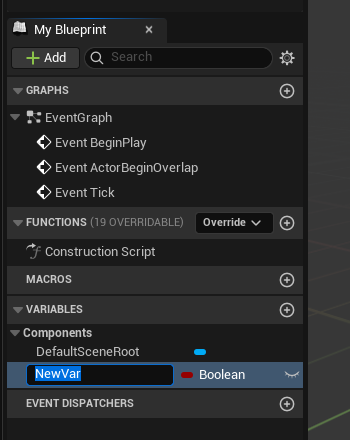
NewVar Boolean in My Blueprint
UE creates a Boolean by default. Rename it before changing the type.
08

Rename NewVar to QuickChat and press Enter.
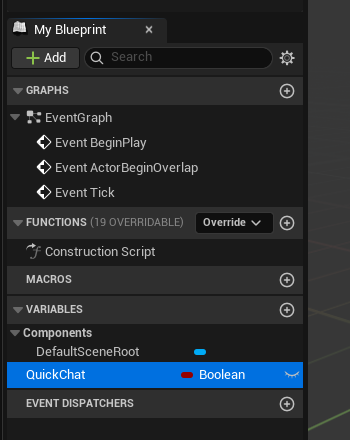
The variable renamed to QuickChat
The name must be QuickChat. It is still Boolean at this frame, which is expected.
09

Click the Variable Type dropdown in Details.
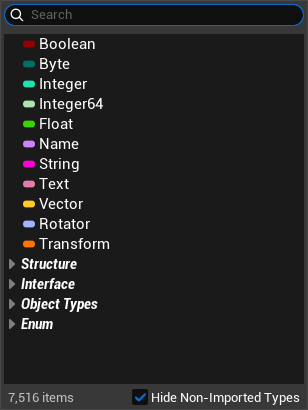
The Variable Type selection menu
The cursor moves into the search box at the top of the type list.
10

Search for Lite Rt Lm Quick Chat.
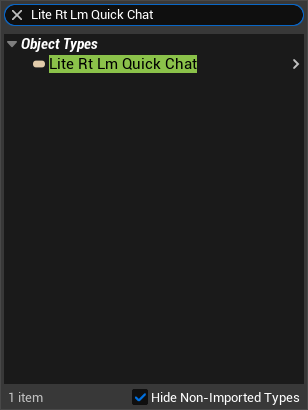
Searching for Lite Rt Lm Quick Chat in the type menu
The result should be reduced to Lite Rt Lm Quick Chat.
11

Select Lite Rt Lm Quick Chat Object Reference.
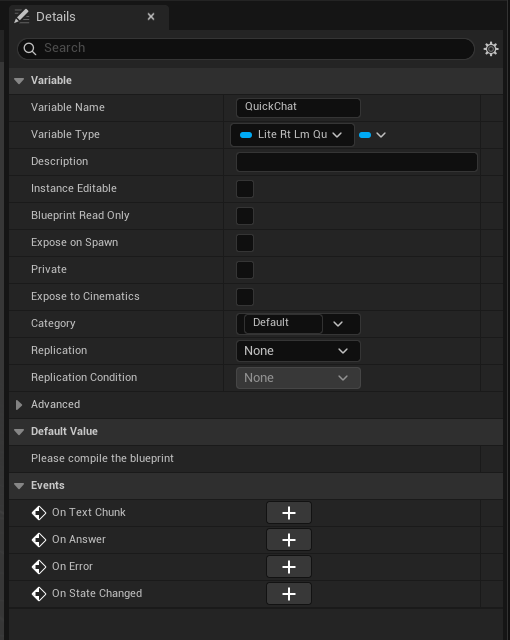
QuickChat set to a Lite Rt Lm Quick Chat object reference
The type becomes a blue object reference and On Text Chunk, On Answer, On Error, and other events appear.
Do not create a new Quick Chat for every question. This member variable must keep the same object if you want conversation memory.

BeginPlay chain

3. Add each node and send the first request

12

Double-click EventGraph to open the event graph.
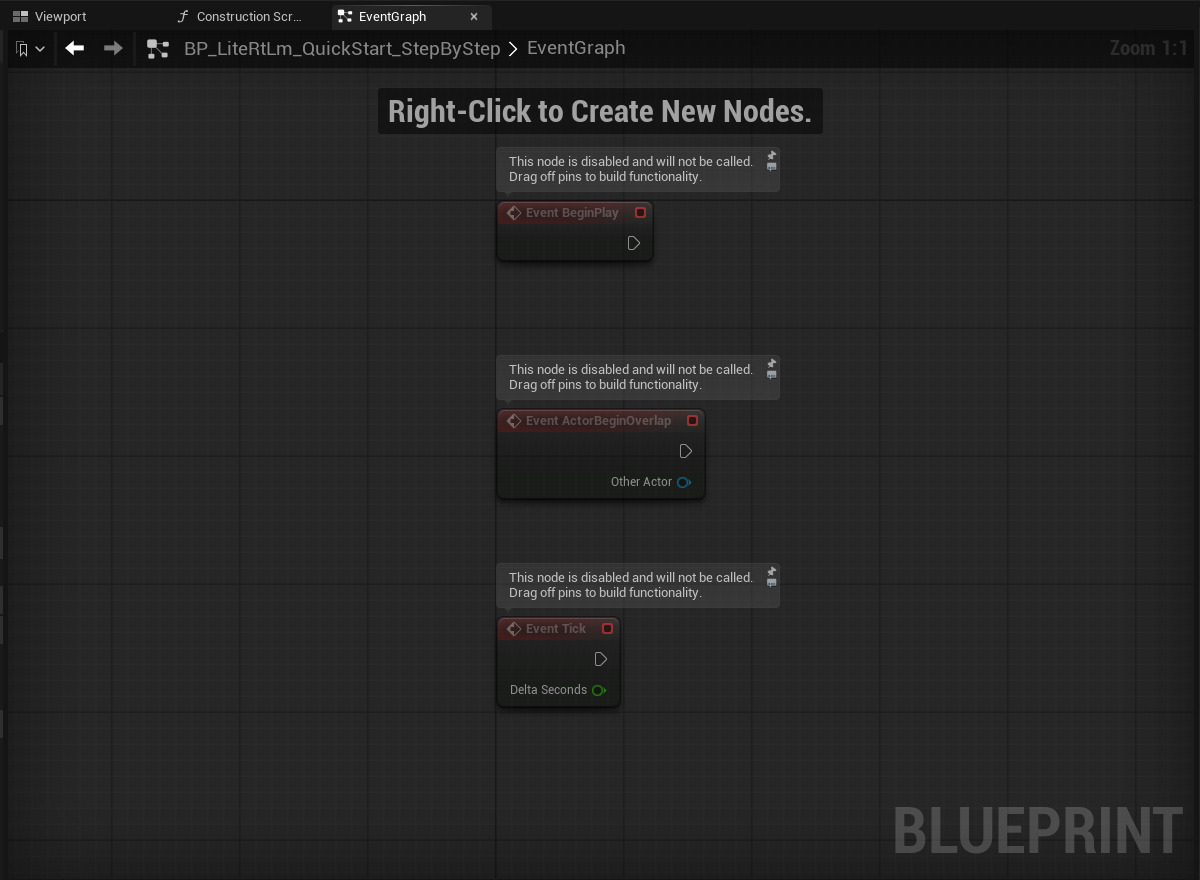
The default EventGraph in a new Actor Blueprint
The default graph contains BeginPlay, ActorBeginOverlap, and Tick.
13

Delete ActorBeginOverlap and Tick, leaving only Event BeginPlay.
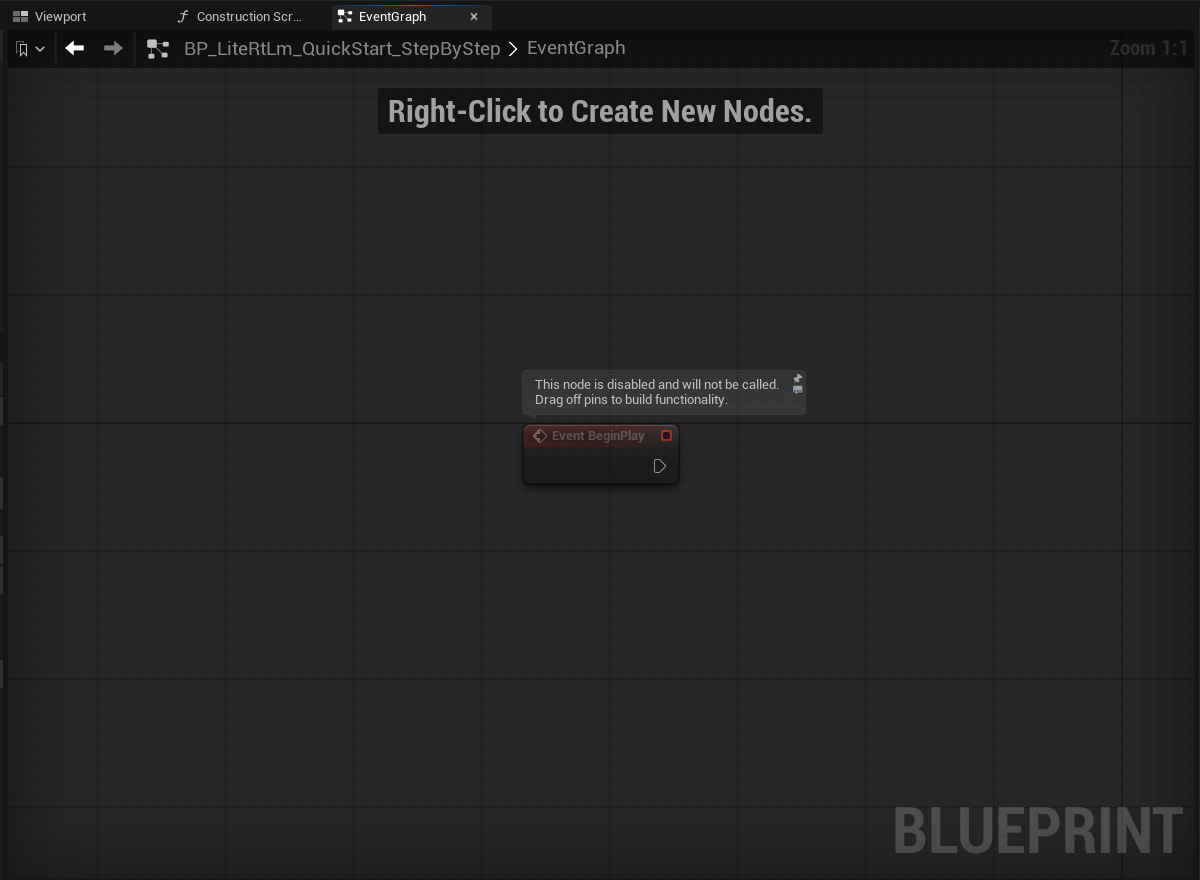
Only Event BeginPlay remains in the EventGraph
The tutorial does not use those events, so removing them makes every later connection easier to verify.
14

Right-click empty space, search for Create Quick Chat, and add it.
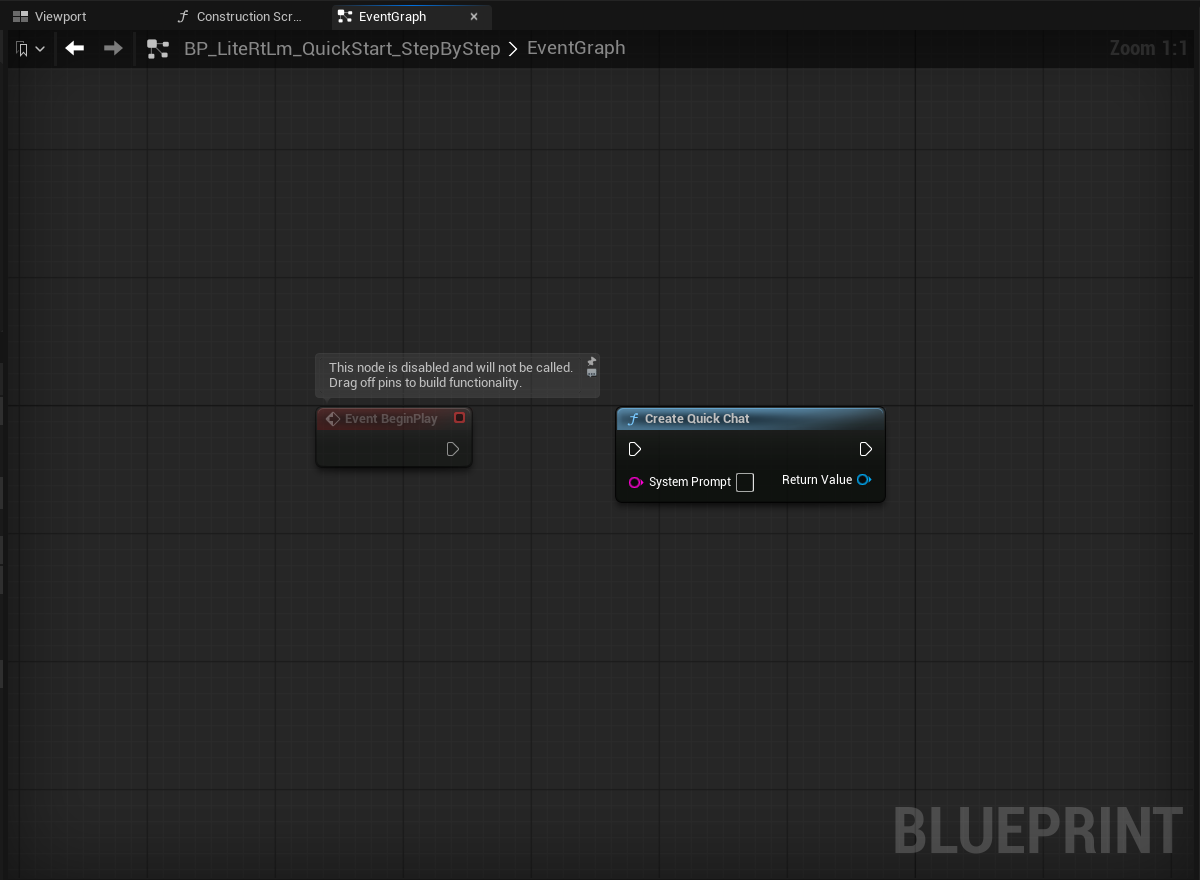
Create Quick Chat added to the EventGraph
Add the node first. Do not connect it yet.
15

Connect the white BeginPlay execution pin to Create Quick Chat.
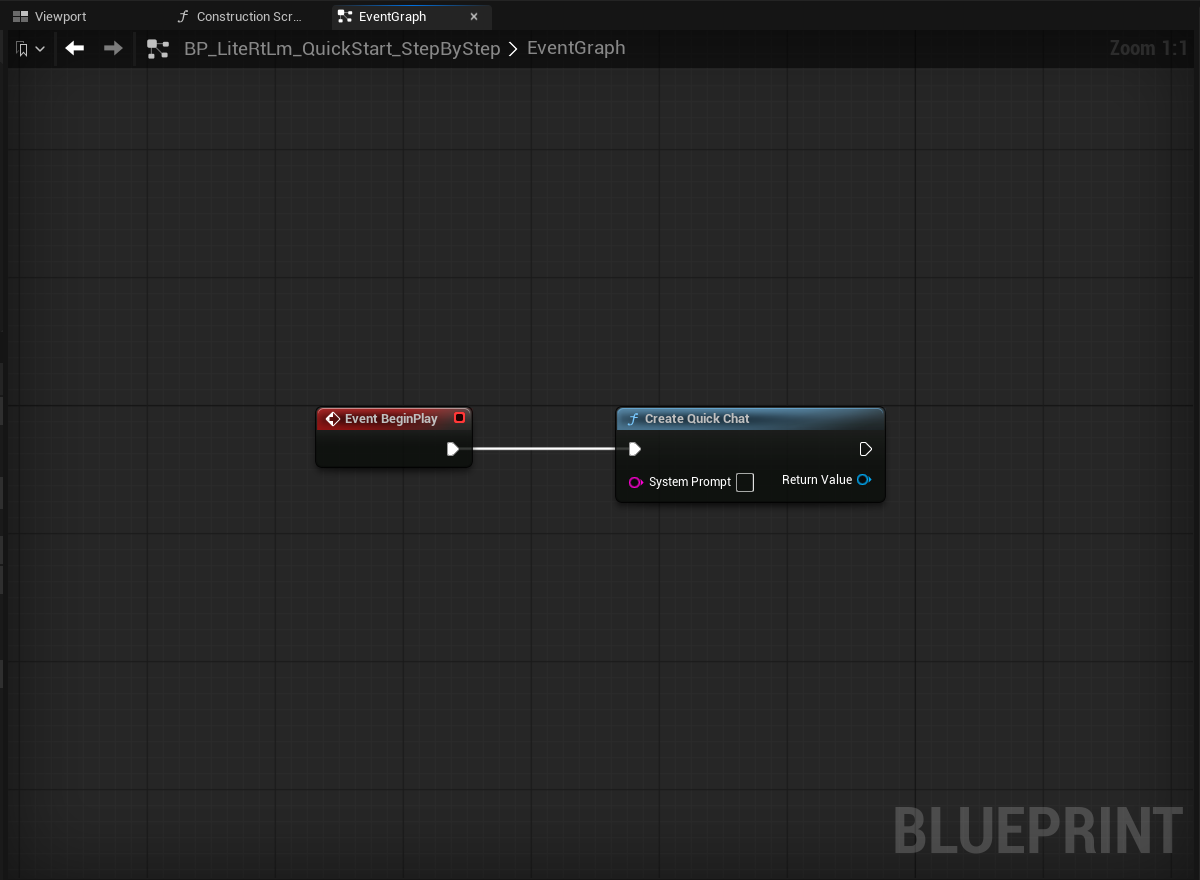
BeginPlay connected to Create Quick Chat
The white wire controls execution order.
16

Set System Prompt to Answer concisely in the user's language.
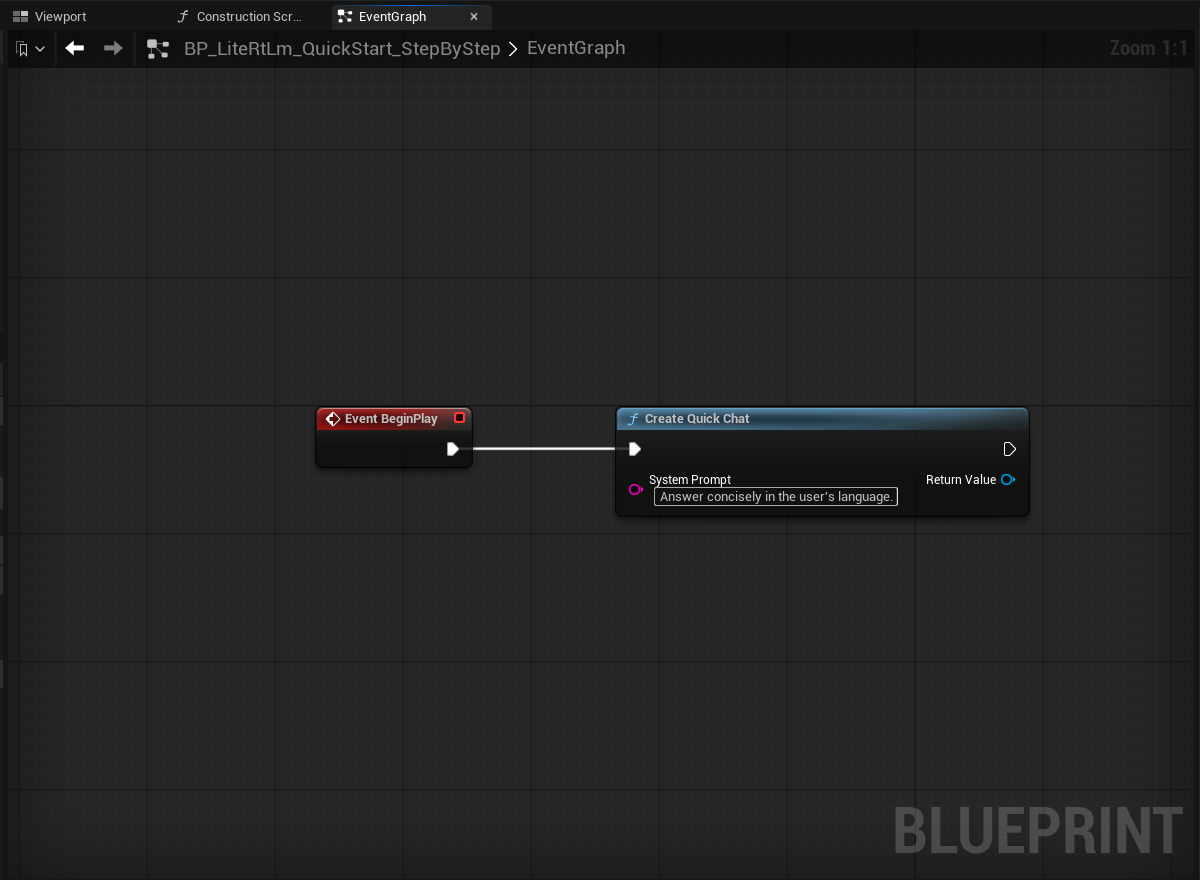
System Prompt filled on Create Quick Chat
Keep the first prompt short. Expand it only after the basic path works.
17

Drag QuickChat into the graph and choose Set.
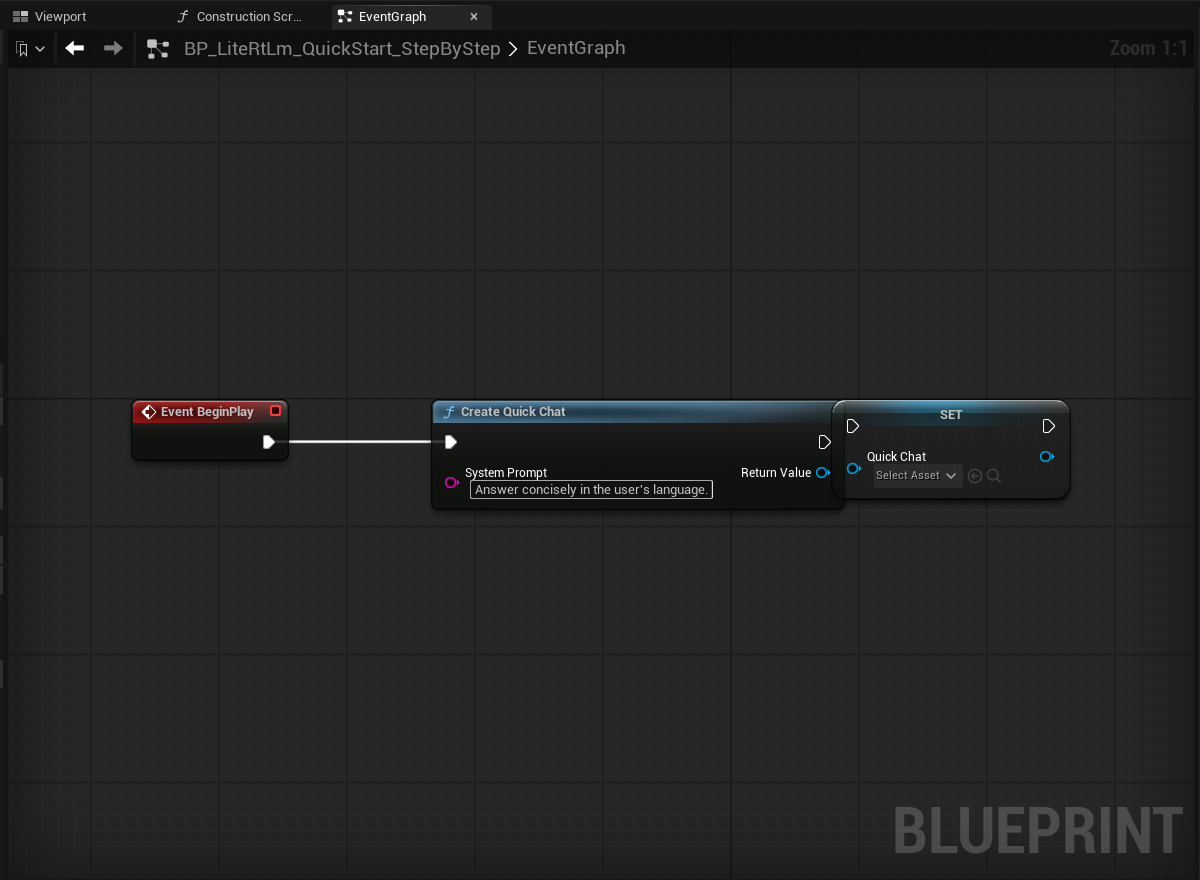
Set QuickChat added to the EventGraph
Add SET Quick Chat and leave it disconnected for this frame.
18

Connect the white execution pins from Create Quick Chat to SET Quick Chat.
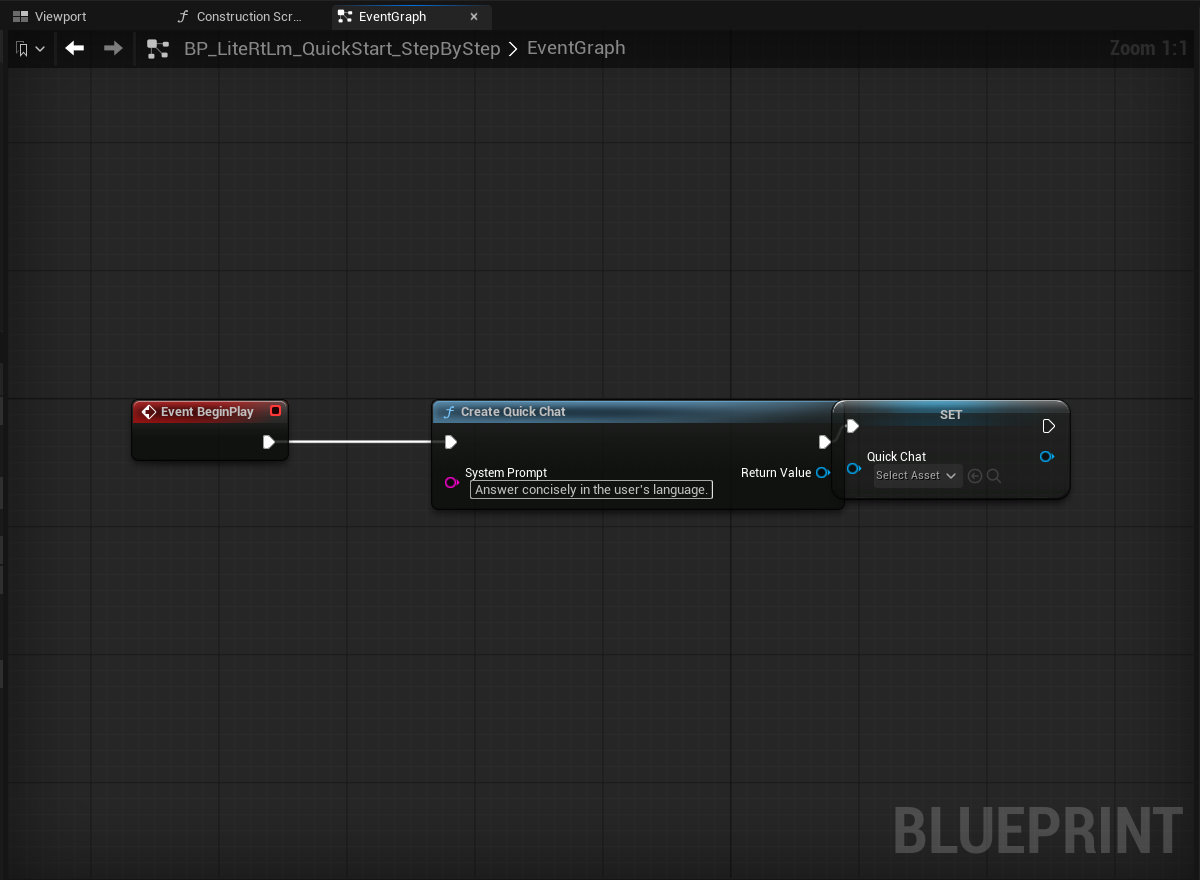
Create Quick Chat execution connected to Set QuickChat
BeginPlay now creates the object before the assignment executes.
19

Connect the blue Return Value pin to the Quick Chat input.
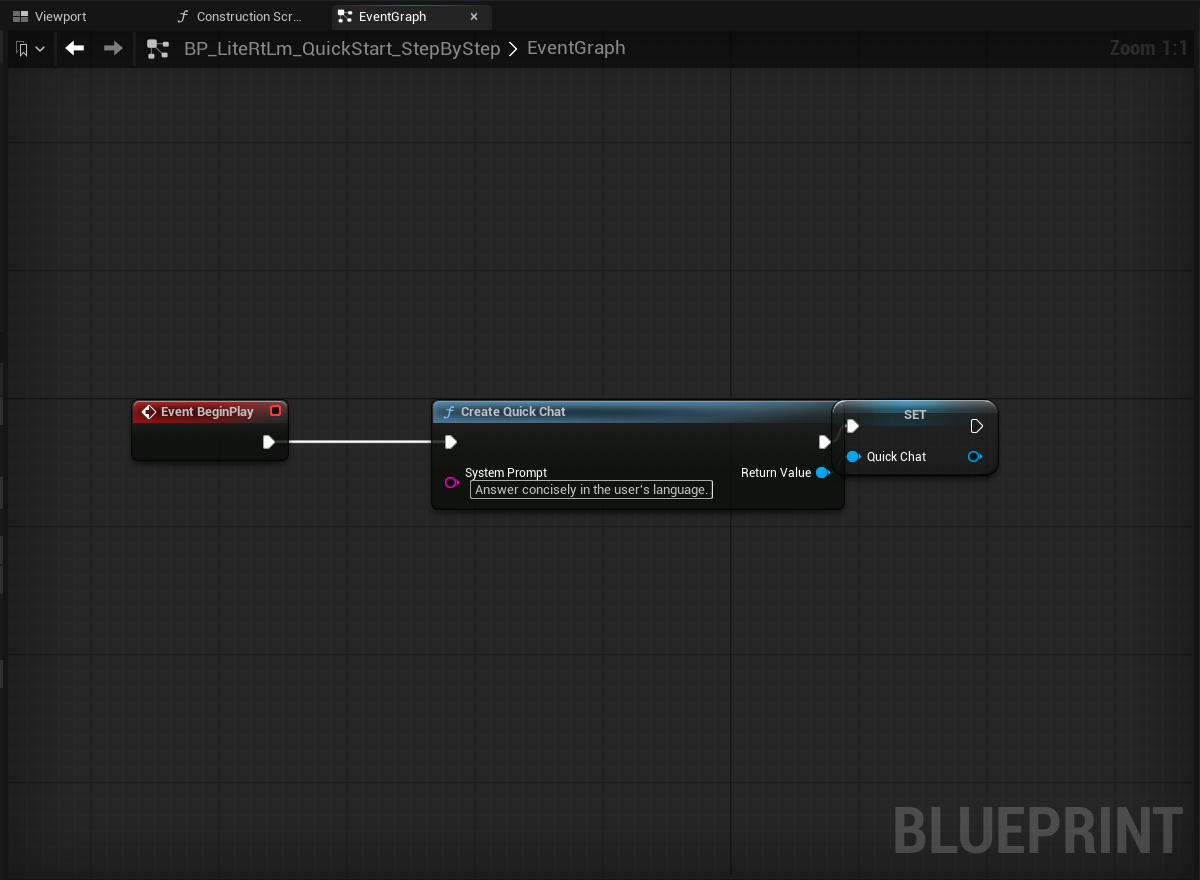
The Create Quick Chat return object stored in QuickChat
The blue wire stores the real Quick Chat object reference. Do not omit it.
20

Add Bind Event to On Answer from the QuickChat reference.
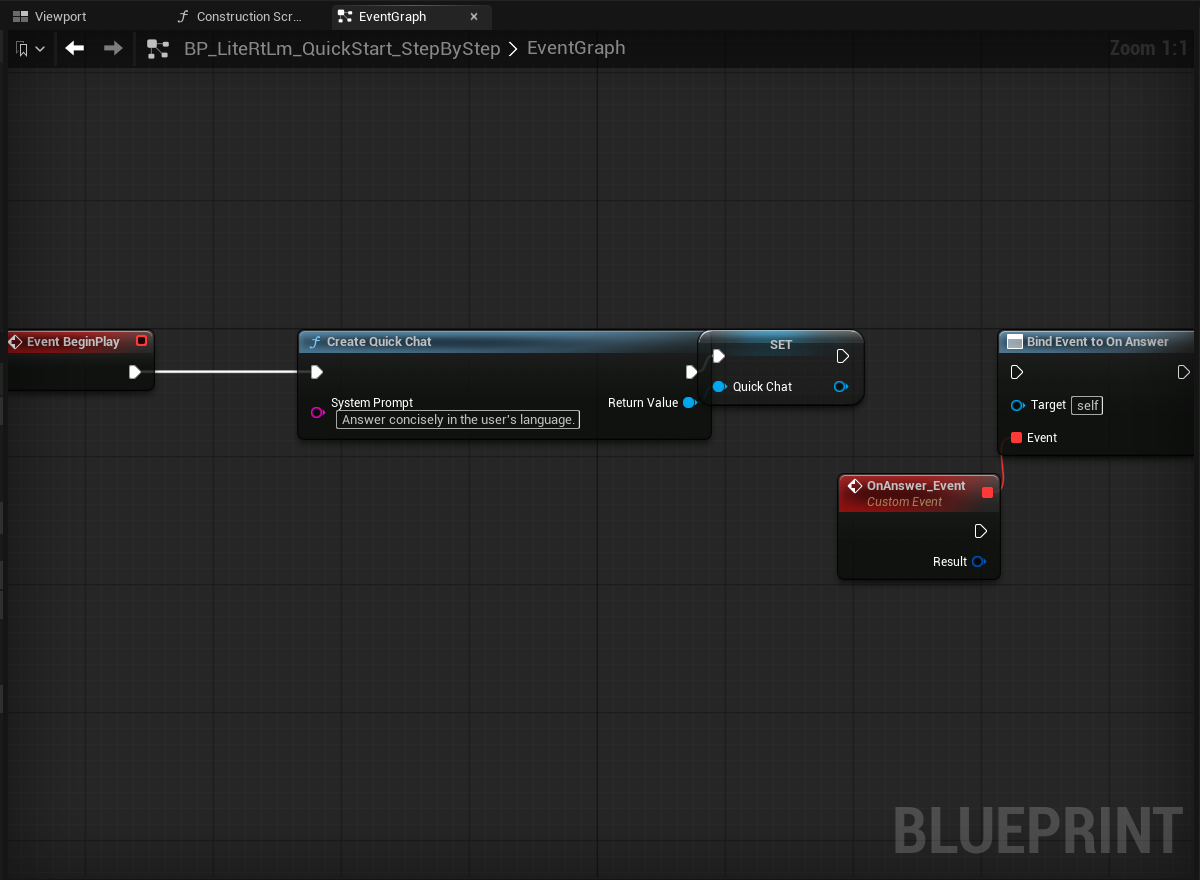
Bind Event to On Answer and its generated OnAnswer Event
UE also creates a matching OnAnswer_Event and connects the red delegate wire automatically.
21

Connect the white SET Quick Chat output to Bind Event to On Answer.
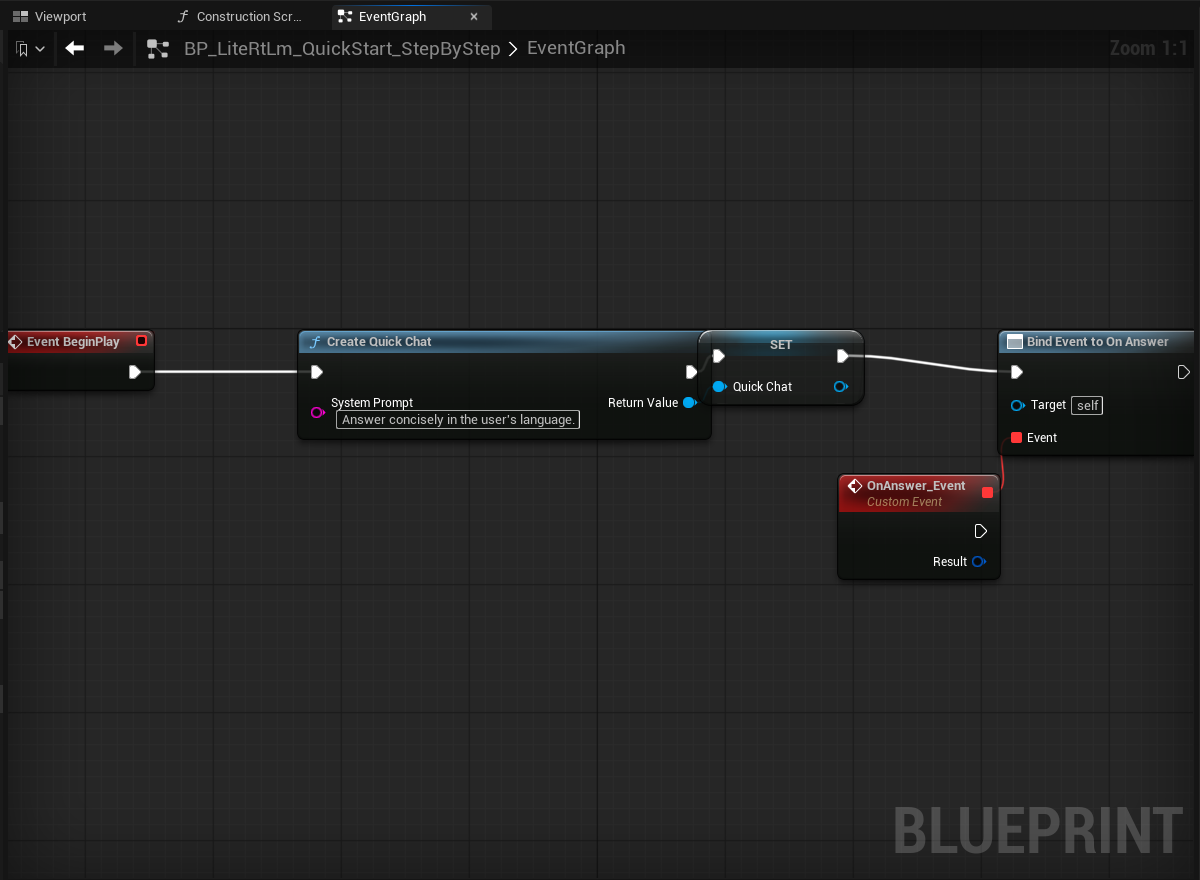
Set QuickChat execution connected to Bind Event to On Answer
The answer handler must be bound before the first Ask.
22

Connect the blue object output on SET to the Bind Target.
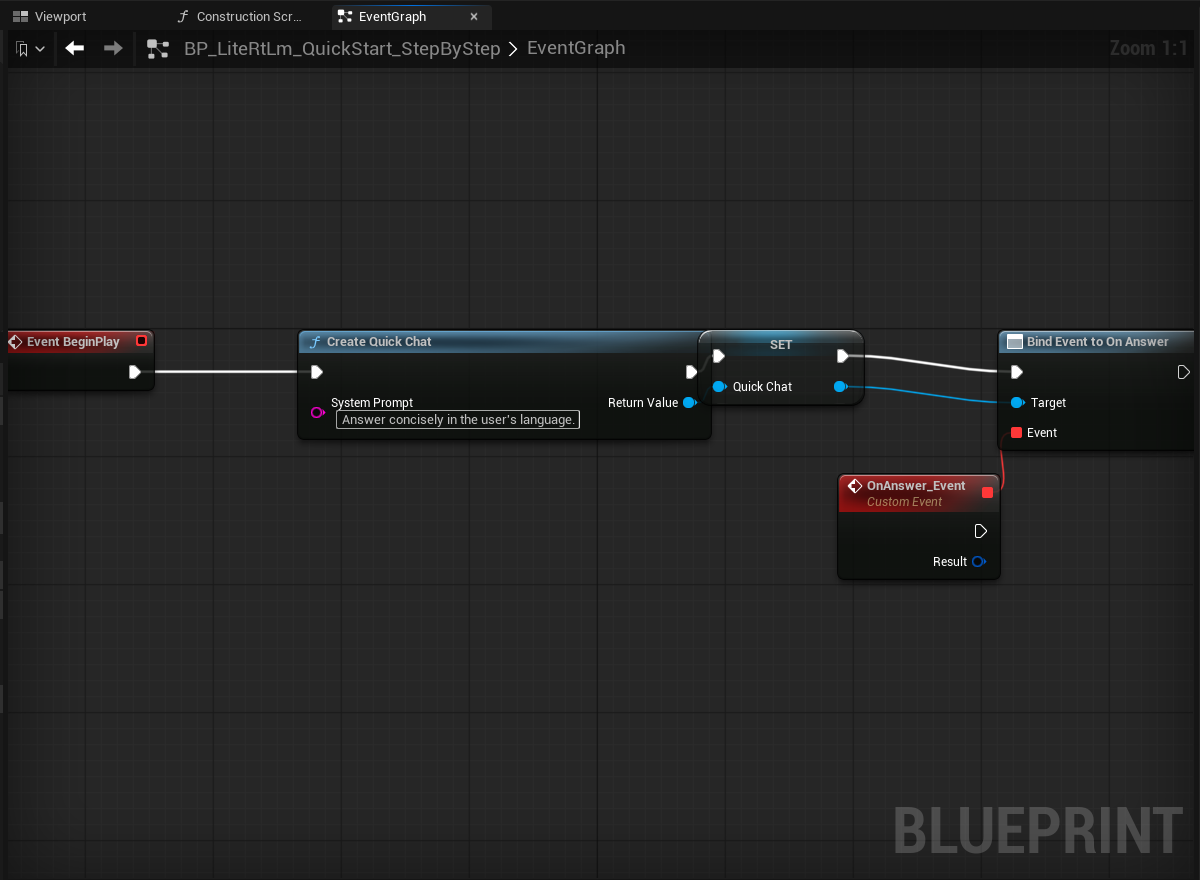
The QuickChat object connected to the Bind Target
Target must be the same QuickChat object that was just stored.
23

Add Ask Once from that same QuickChat reference.
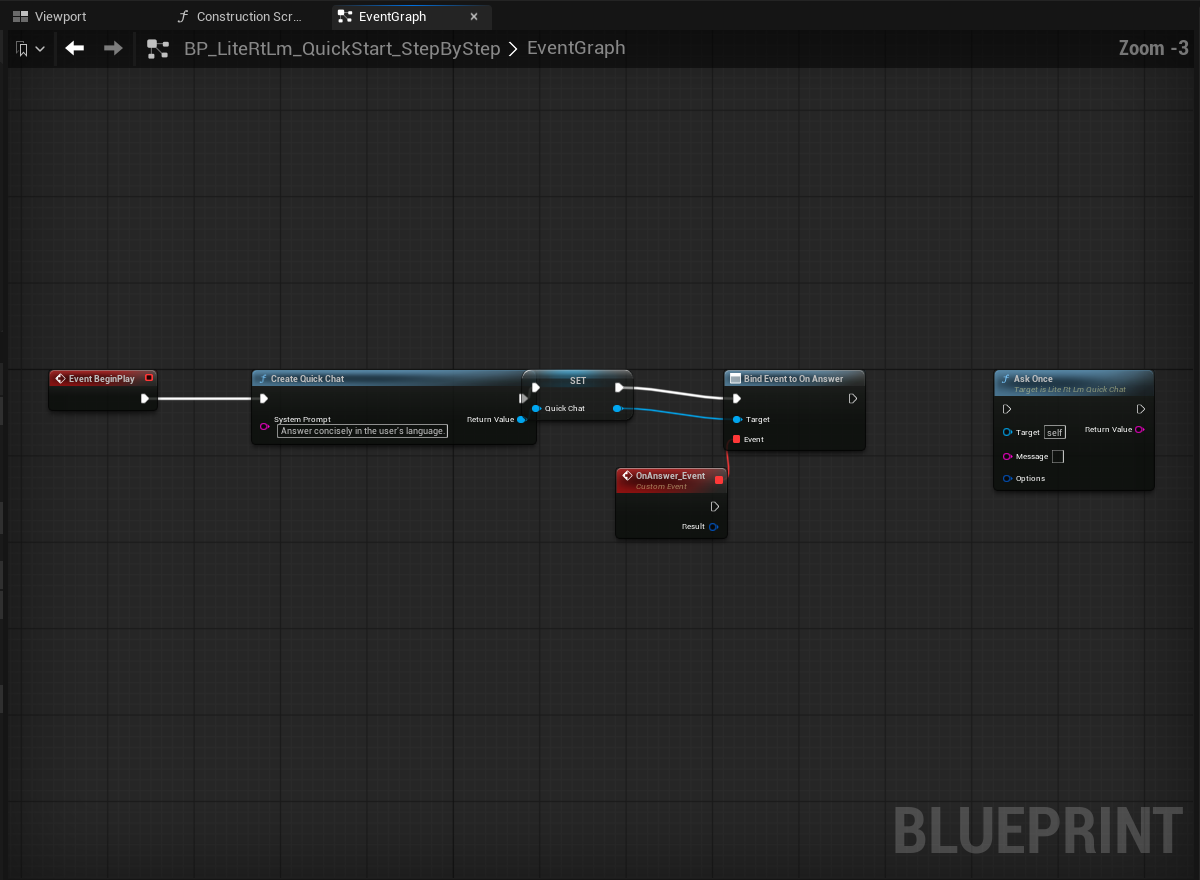
Ask Once added to the EventGraph
Add the node only. Its Return Value is a request ID, not the model answer.
24

Connect the white Bind Event to On Answer output to Ask Once.
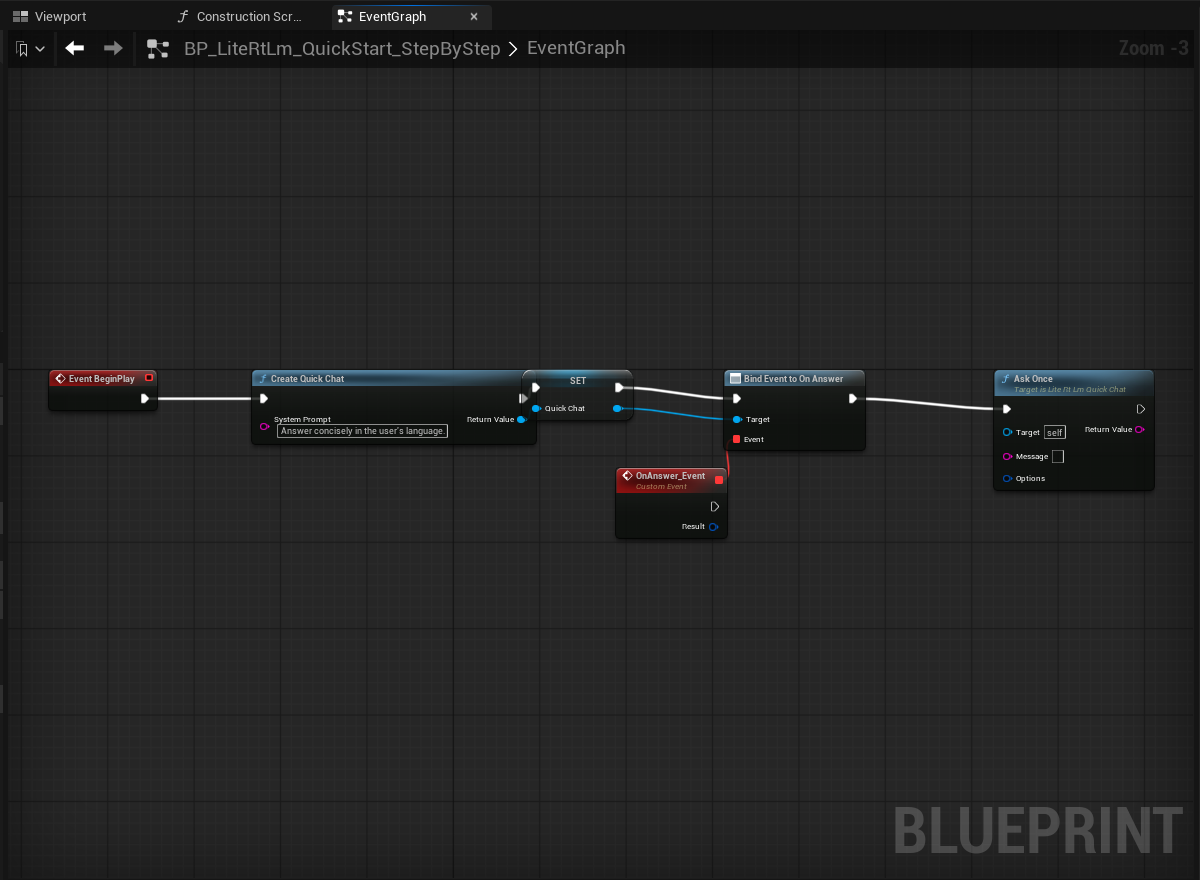
Bind Event to On Answer execution connected to Ask Once
The order is now create → store → bind → ask.
25

Connect the blue QuickChat object output to the Ask Once Target.
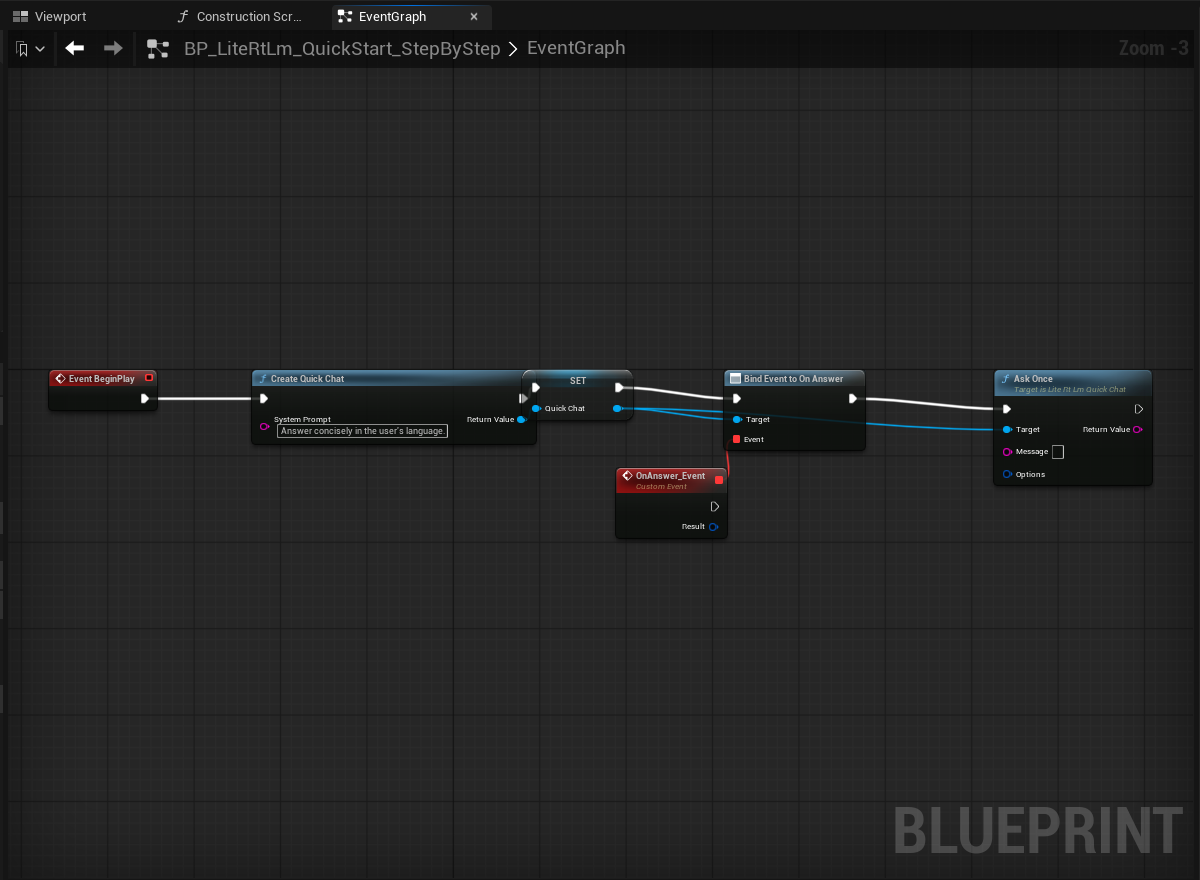
The QuickChat object connected to the Ask Once Target
Bind and Ask must use the same Target.
26

Set Message to Hello from Unreal Engine.
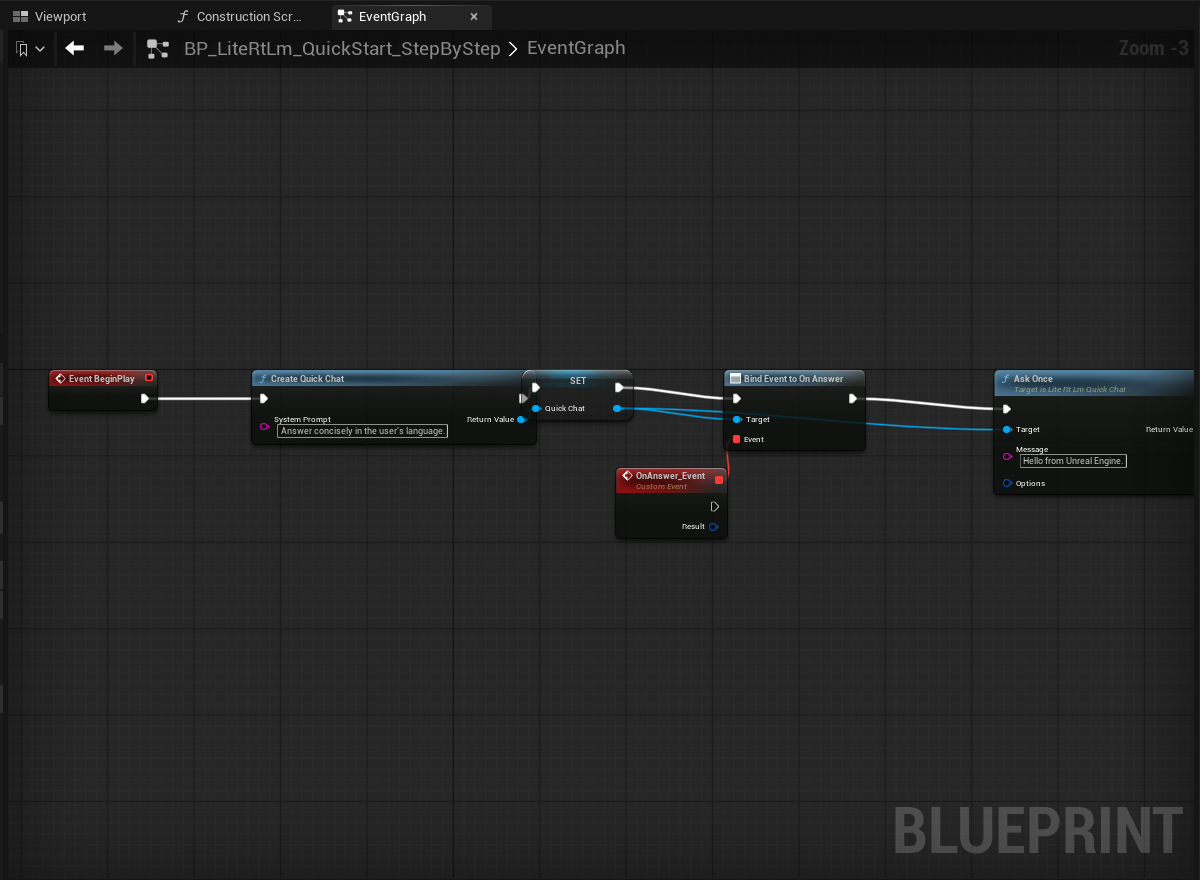
A short test message entered on Ask Once
Keep the first message short so a real local answer is easy to recognize.

On Answer chain

4. Read and display the asynchronous answer one node at a time

27

Add Break Lite Rt Lm Result near OnAnswer_Event.
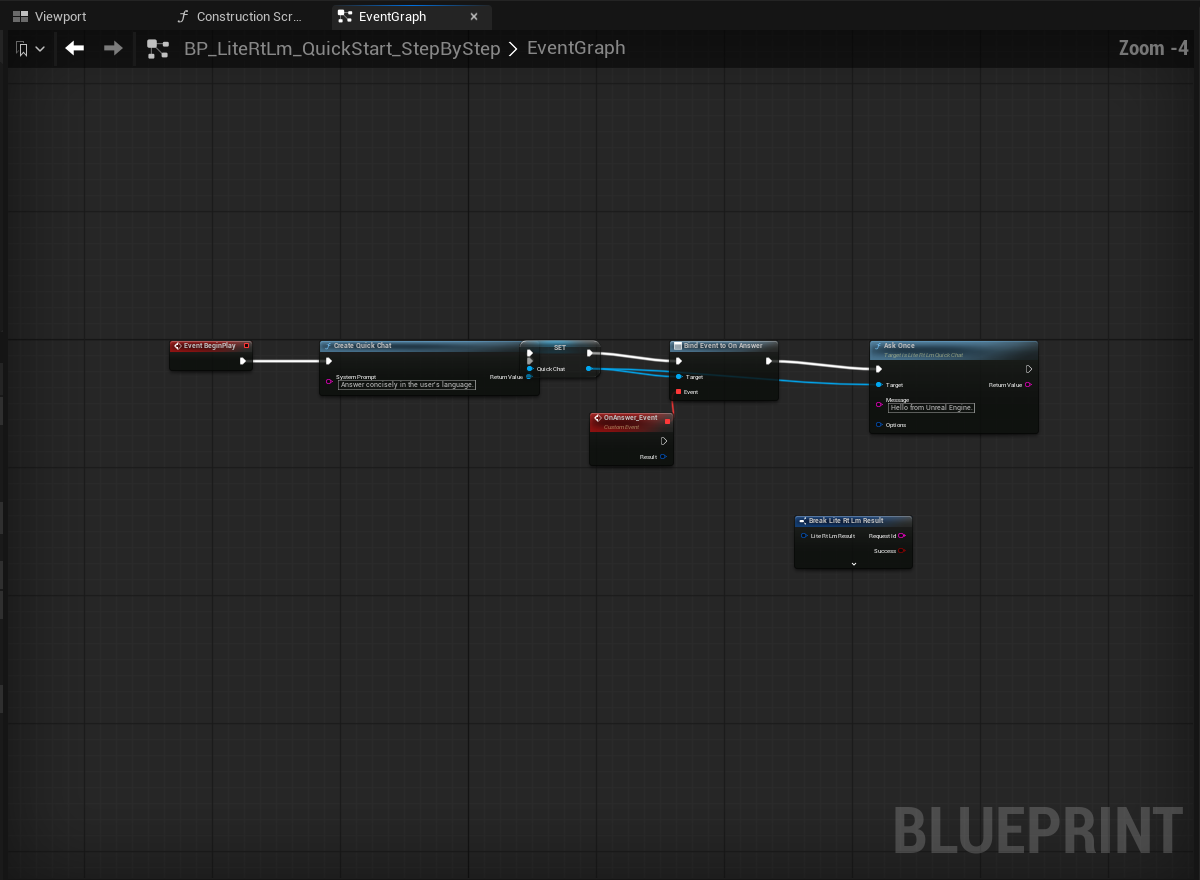
Break Lite Rt Lm Result added near OnAnswer Event
The answer text is inside the Result struct, so the struct must be broken first.
28

Connect OnAnswer_Event Result to the Break node input.
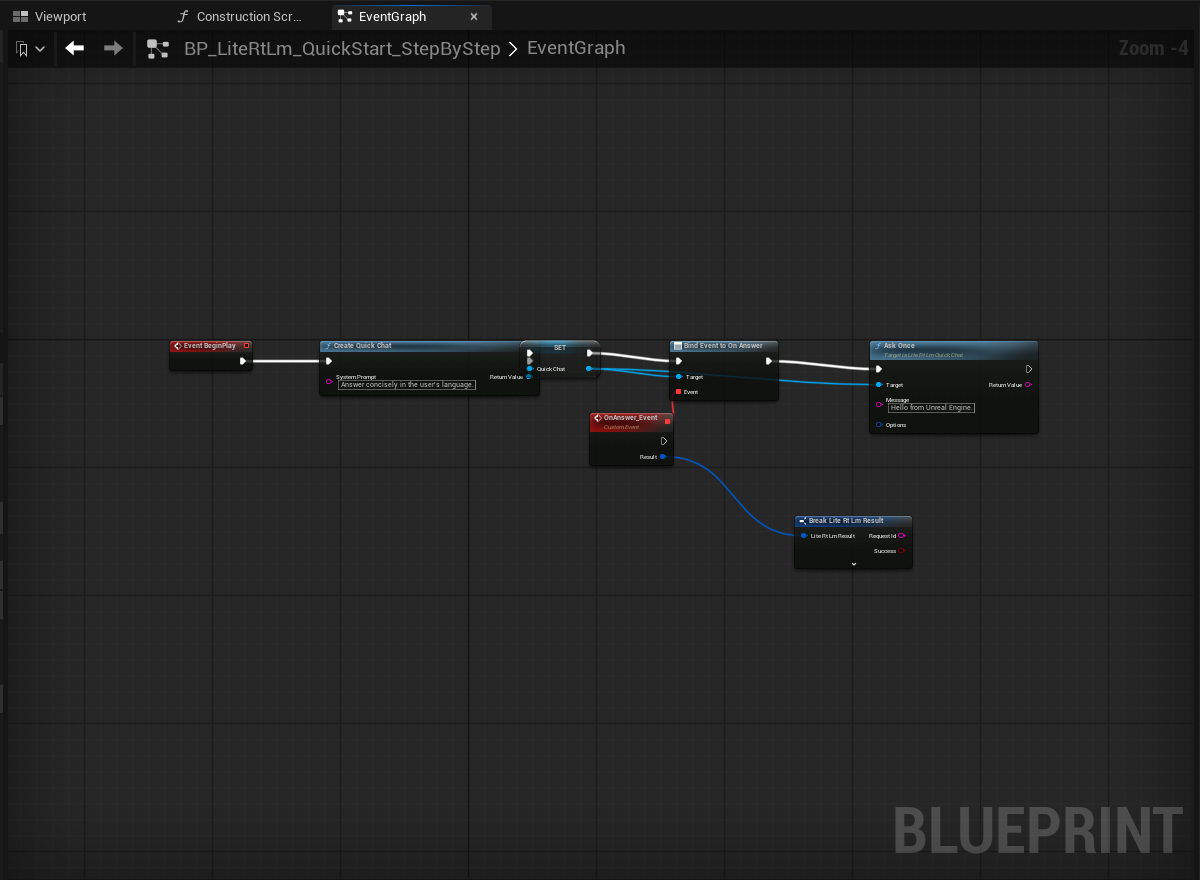
OnAnswer Result connected to Break Lite Rt Lm Result
The blue struct wire carries Text, Error, Metrics, and the rest of the result.
29

Add Print String on the right.

Print String added to the answer chain
Keep the defaults. It will print to both the screen and Output Log.
30

Connect the white OnAnswer_Event execution output to Print String.
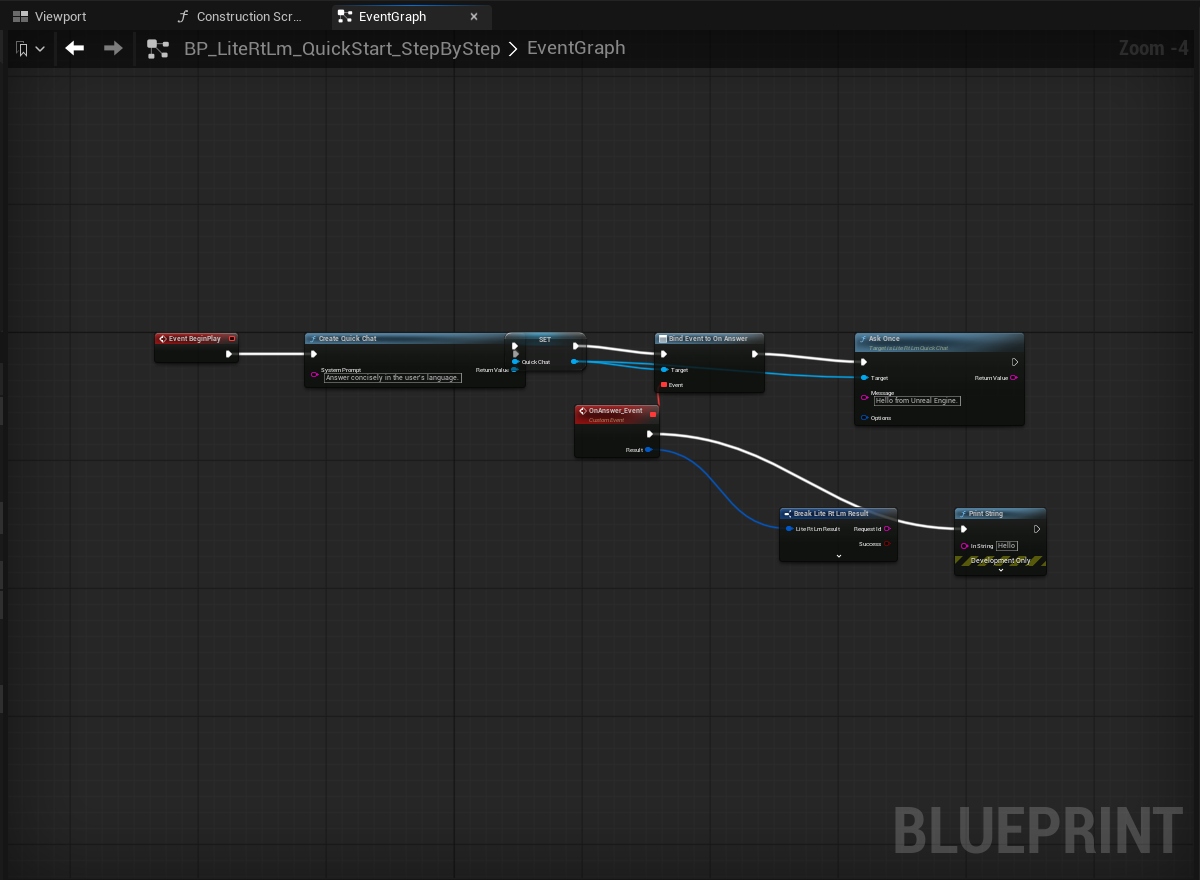
OnAnswer Event execution connected to Print String
Print String now executes only when On Answer actually fires.
31

Connect Text on the Break node to In String on Print String.
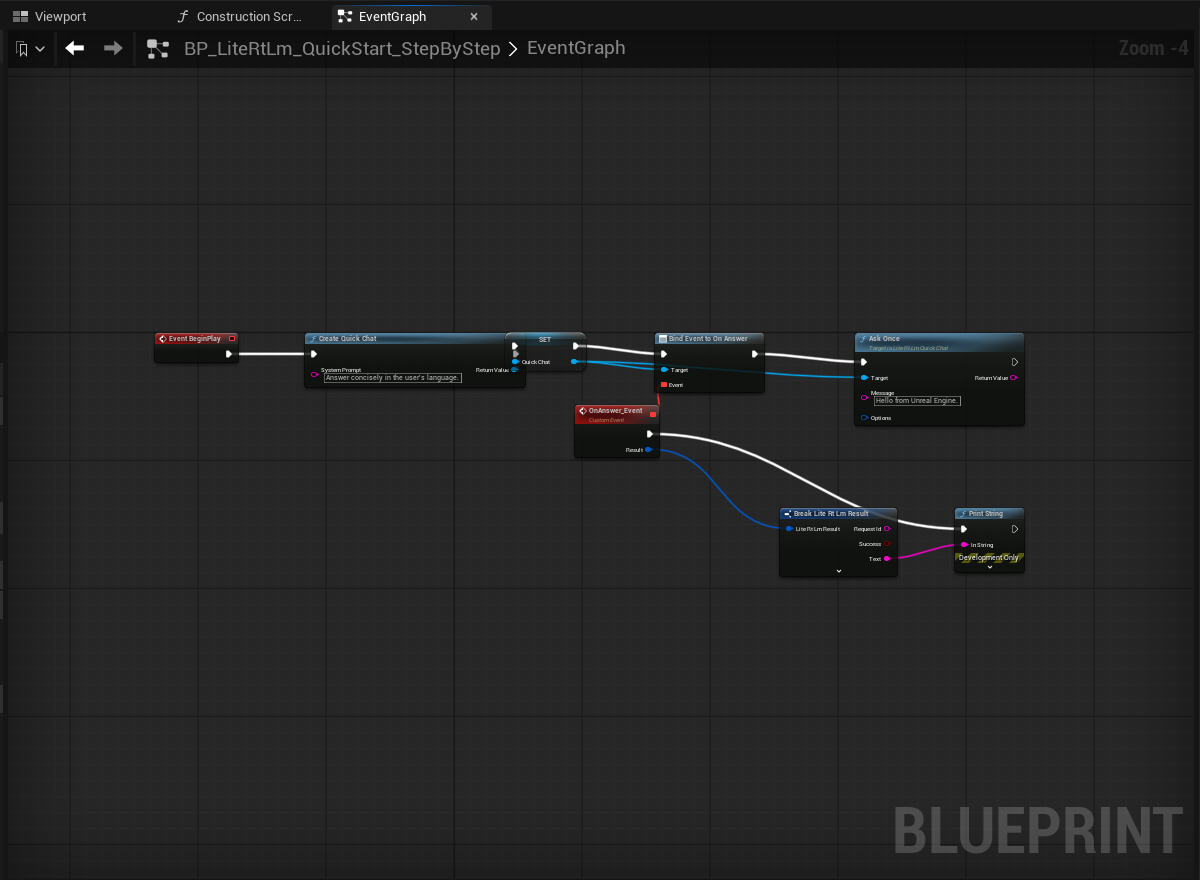
Break Result Text connected to Print String
This purple wire is the actual model answer.
32

Arrange the nodes in two rows and press Home to frame the graph.
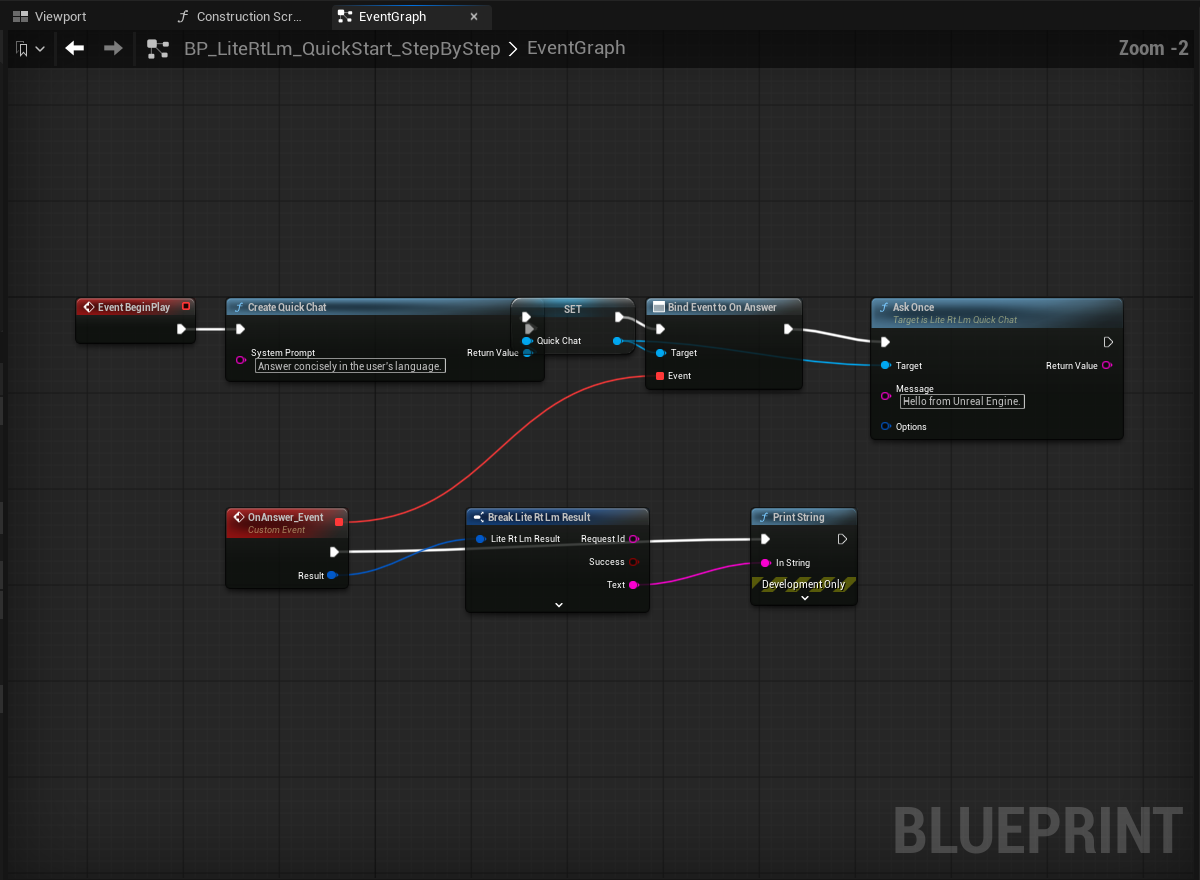
The completed Quick Chat EventGraph arranged in two rows
The top row creates, binds, and asks. The bottom row receives, breaks, and displays the answer.
33

Click Compile, confirm there are no red errors, and then click Save.
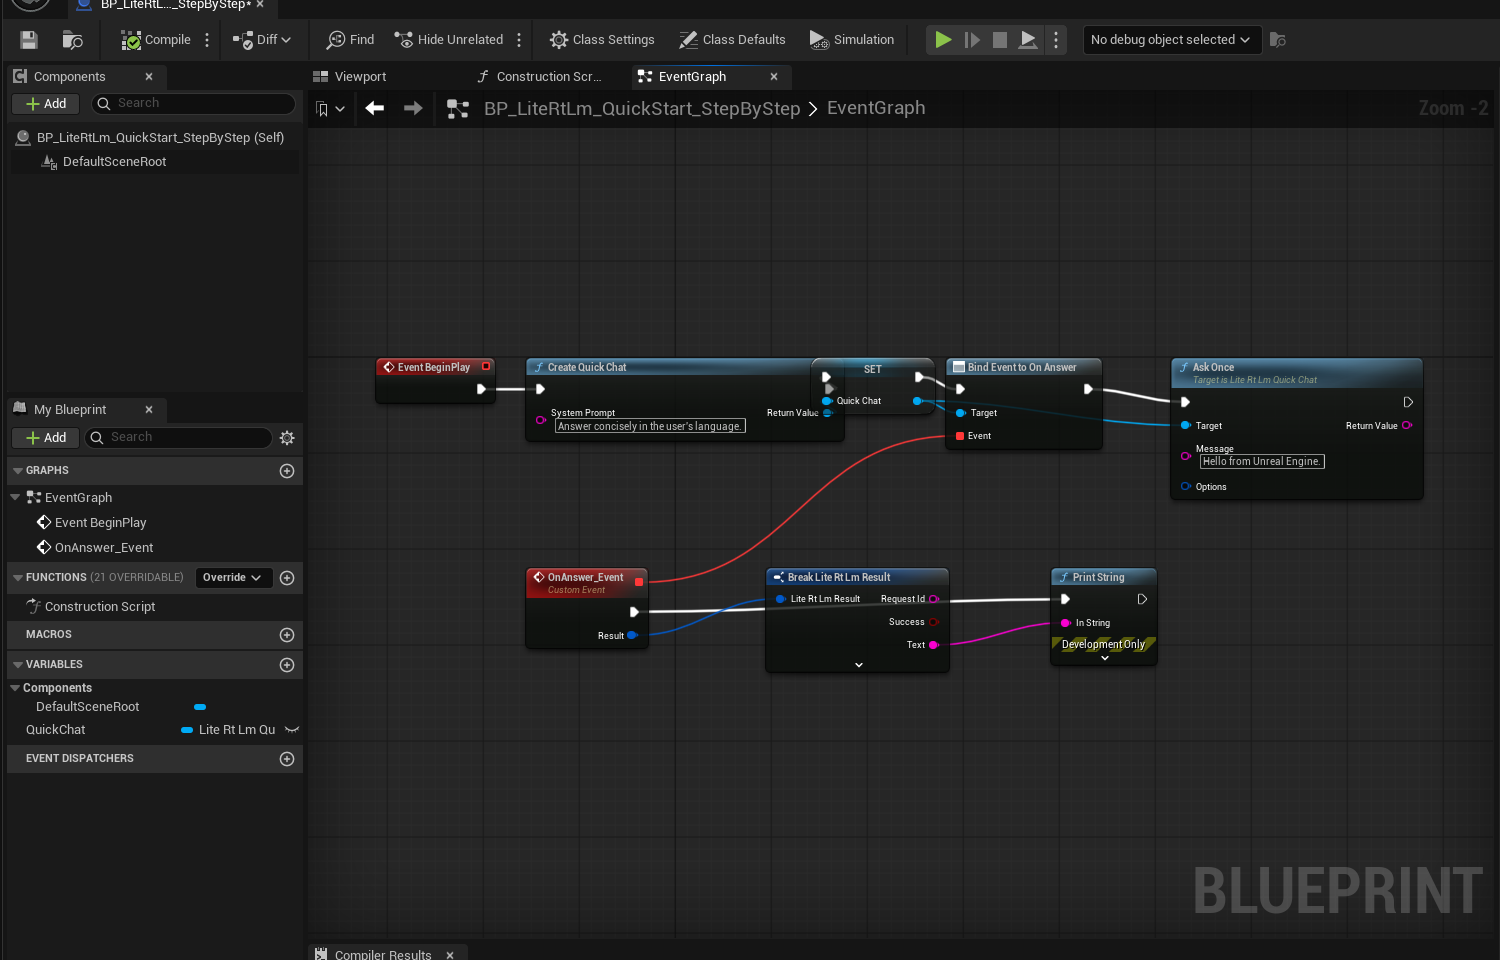
The Quick Chat Blueprint compiled successfully
If compilation fails, return to the previous full graph and compare every white, blue, and purple wire.

Level and PIE

5. Place the Actor in the level and see a real answer

34

Drag BP_LiteRtLm_QuickStart_StepByStep from the Content Browser into the level.
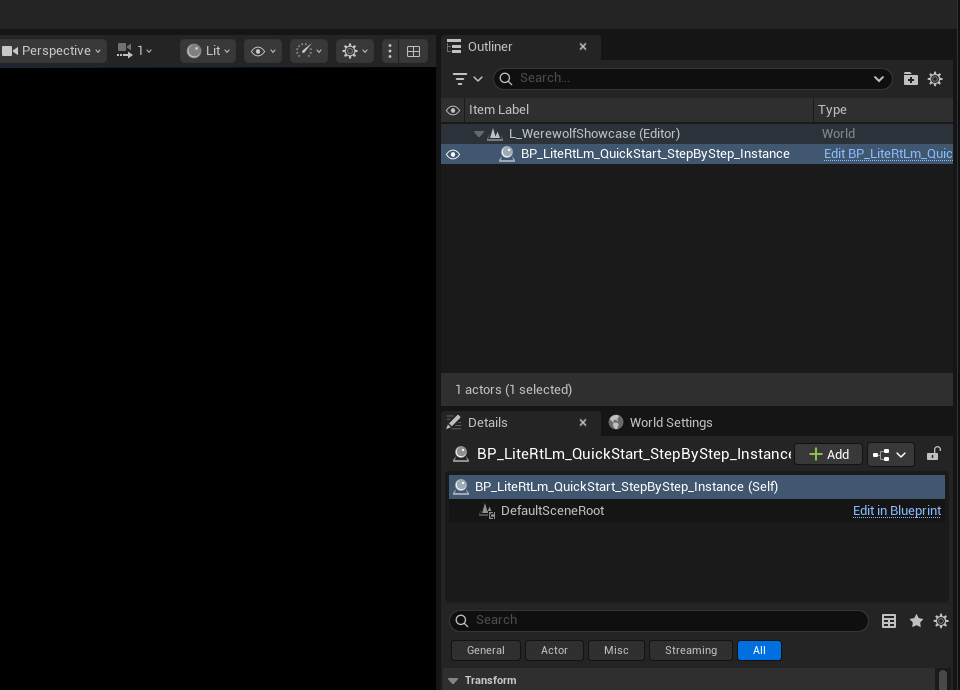
The Quick Start Actor instance visible in the Outliner
After dropping it, an Actor instance must appear in the Outliner. Creating the asset alone does not run BeginPlay.
35

Click Play and wait for the first local model initialization.
UE5 running Play In Editor
The first run loads the GPU model and is usually slower than later questions. Do not click Play repeatedly.
36

Open Output Log, search for BlueprintUserMessages, and confirm the model answer.

A real local model answer visible in Output Log
Observed answer: Hello! How can I help you today with Unreal Engine?. Create, Bind, Ask, and On Answer are now all working.

Complete demo

6. After the basic path works, continue with the full Werewolf Demo

The Quick Start ends here. The next two frames only move you into the real multi-Agent sample. Independent memories, phases, pause/resume, and orchestration belong in the separate multi-conversation guide.

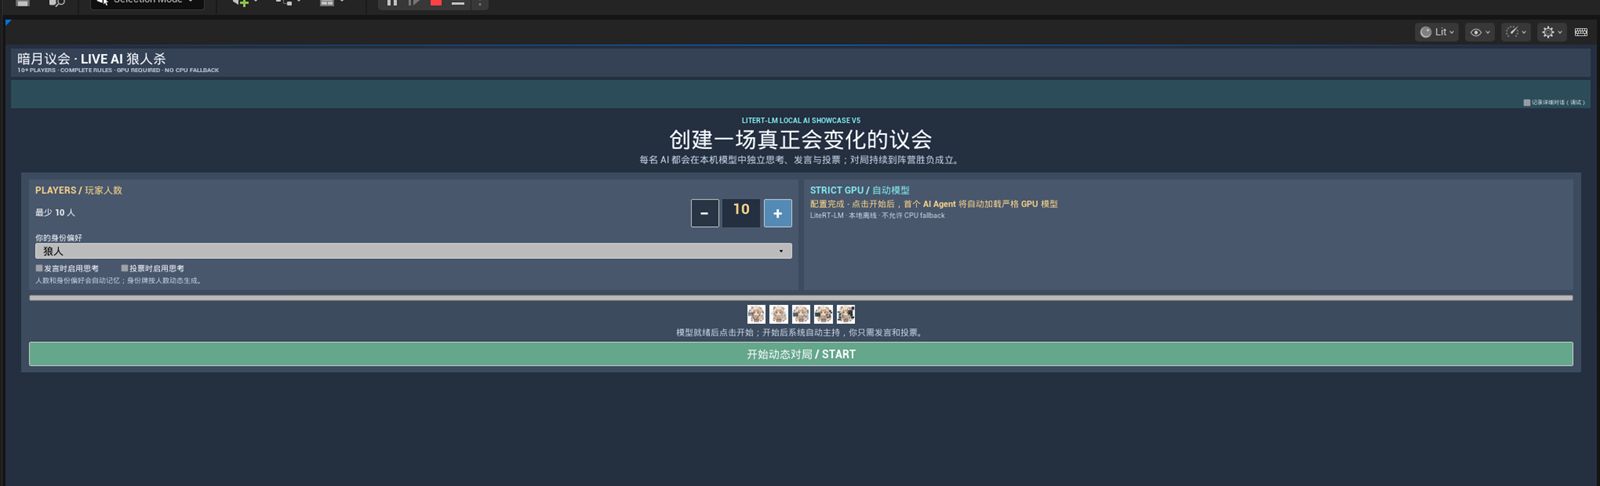
37

Open L_WerewolfShowcase, click Play, and confirm the player count and role preference.
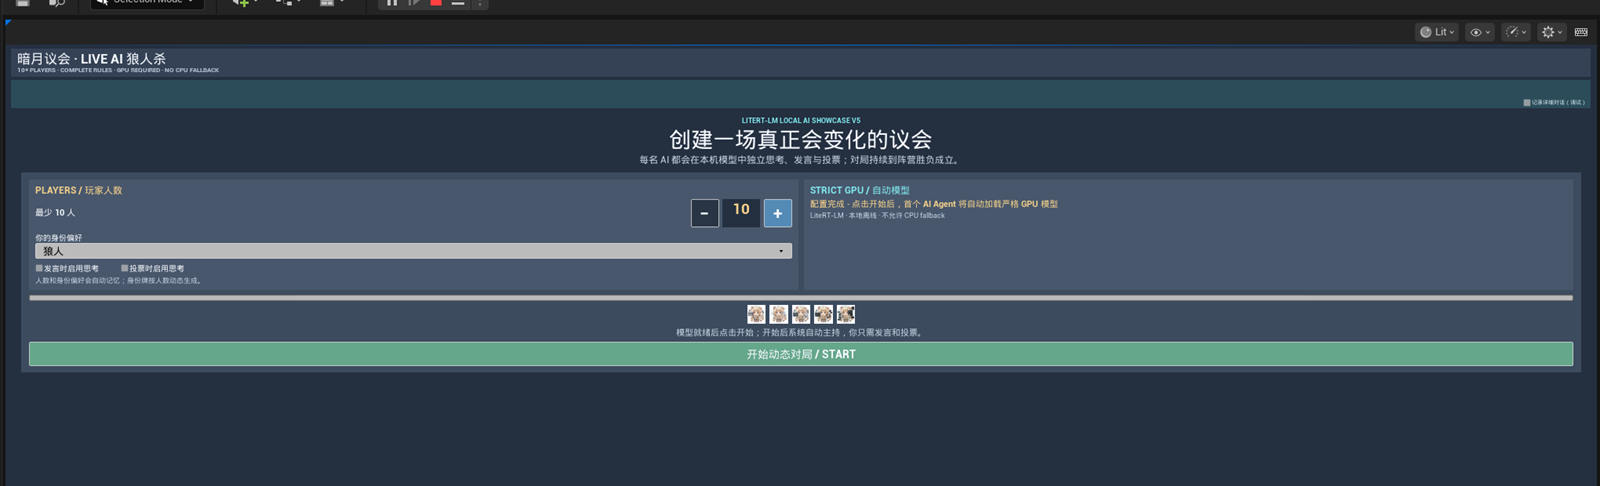
Match configuration screen in the full Werewolf Demo
The Demo gives every AI character an independent conversation. The default shown here is 10 players on the strict GPU model.
38

Click START and confirm that all 10 players enter the Night Action screen.
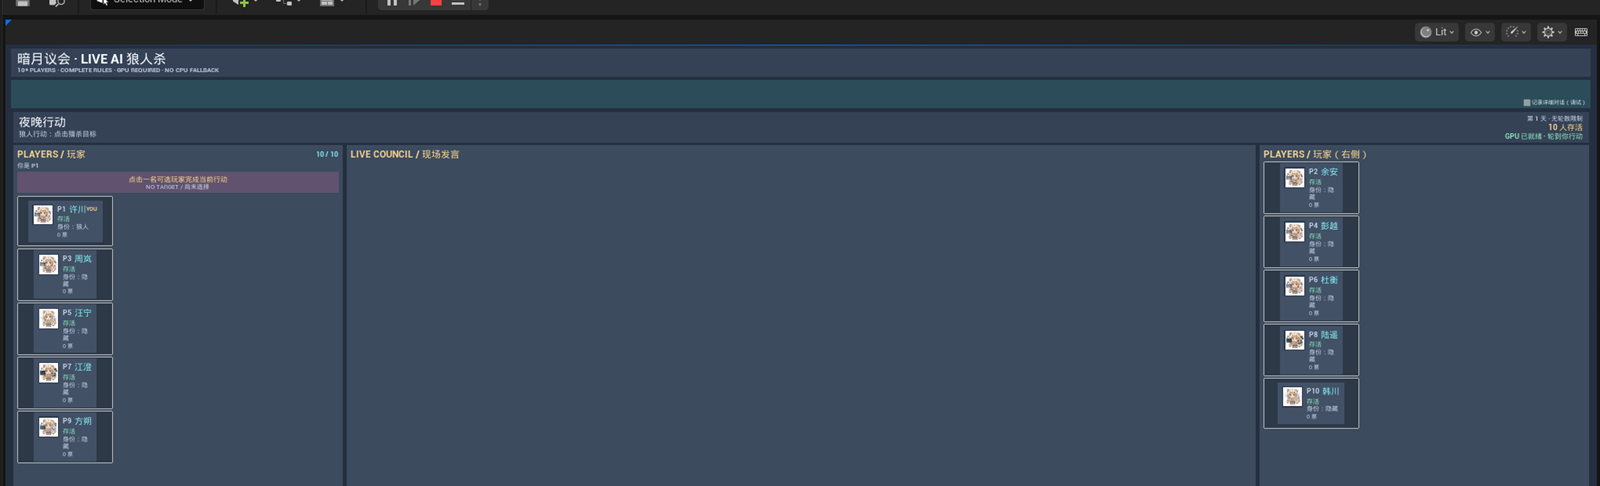
The Werewolf Demo running with 10 players in Night Action
This is the real multi-conversation result: roster, phase, live council, and independent Agent state are active at the same time.

Completion criteria

Your first local AI conversation is complete only when all four are true

  • QuickChat is a Lite Rt Lm Quick Chat Object Reference.
  • Quick Chat is created once on BeginPlay and stored in a member variable.
  • On Answer is bound before Ask Once.
  • Output Log shows a real model answer from Result.Text.